Setup
We are in the process of porting our user manual, this page might contain incorrect information.
Setup
System Settings
To access the System Settings screen, click on the Setup tab and then on System Settings inside the drop-down menu.
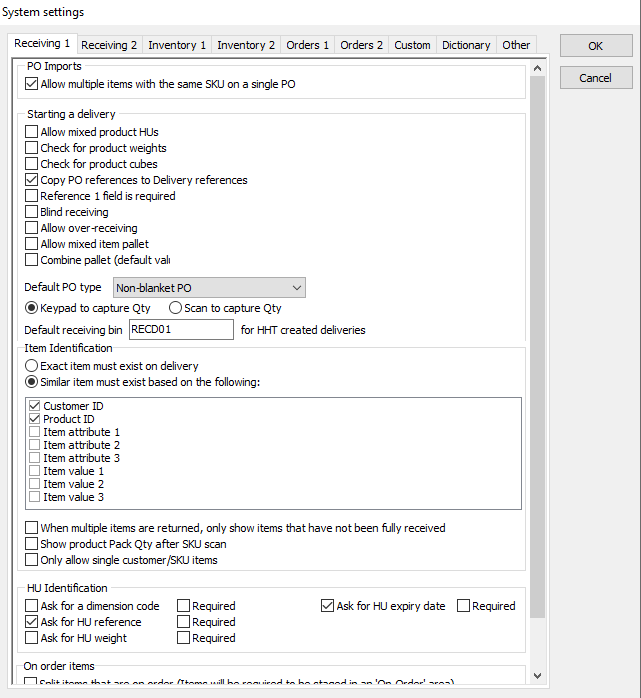
Receiving 1
Receiving settings can be accessed and edited here. Settings for the following processes can be found here:
PO Imports
Starting a delivery
Item Identification
HU Identification
On order items
Receiving 2
Receiving settings can be accessed and edited here. Settings for the following processes can be found here:
HU Stacking & Staging
Process delivery
Accepting a delivery
Inventory 1
Inventory settings can be accessed and edited here. Settings for the following processes can be found here:
HU Split
Decanting
HU Move
Pallet Move
Dimensions
Stocktake
HU Count
Slotting
HU Consume
Inventory 2
Inventory settings can be accessed and edited here. Settings for the following processes can be found here:
DU Count
Overflow Management
Item Identification
Touch Screen Sorting
Orders 1
Settings for Orders can be accessed and edited here. Settings for the following processes can be found here:
Order creation
Allocation
Packing
Picking
Despatch
Consolidation
DU Seal
Orders 2
Settings for Orders can be accessed and edited here. Settings for the following processes can be found here:
DU Confirm
Shipment creation
DU Ship
Completing a shipment
Custom
Custom options can be viewed here.
Dictionary
Dictionary details for settings can be accessed and edited here.
By selecting an entry, you can edit its details by completing the applicable fields at the bottom of the window and clicking OK.
By right-clicking an entry, you can perform the following functions:
Add
Click this to add a new entry. Complete the fields at the bottom of the window and click OK.
Delete
Click this to delete the selected entry. Click Yes at the confirmation pop-up screen to confirm this action.
Other
Settings for the following processes can be accessed and edited here:
Data history
Reporting
Enforce Strict Serials
System Settings > Other > Enforce Strict Serialization
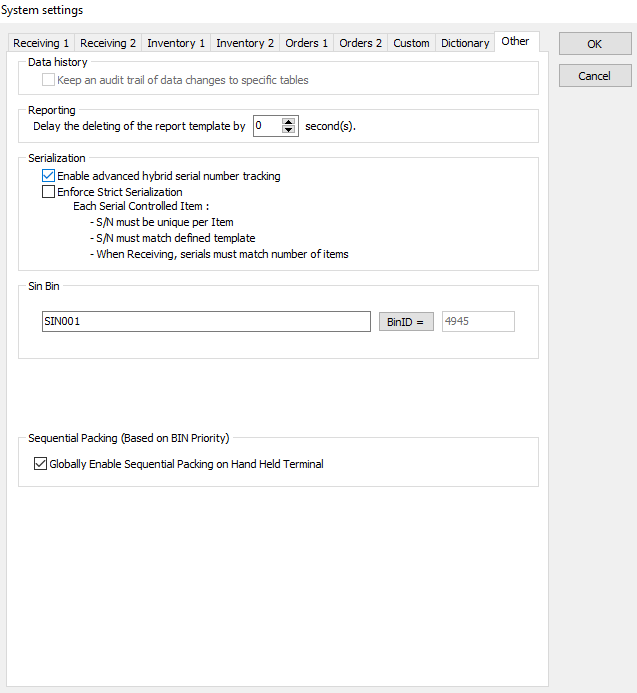
When Strict Serialisation is enforced, each product is able to have its own unique parameters for its serial numbers.
Connection Settings
To access the Connection Settings screen, click on the Setup tab and then on Connection Settings inside the drop-down menu.
See Section 2.1.1 for information on managing datasets.
Scanner Entities
To access the Scanner Entities screen, click on the Setup tab and then on Scanner Entities inside the drop-down menu.
Scan entities displays a table of the current scanner entities in the database. The Edit entity fields are used when editing or creating a new entity. The Mask explanation pane explains the various symbols used in the scanner mask and what rules they represent.
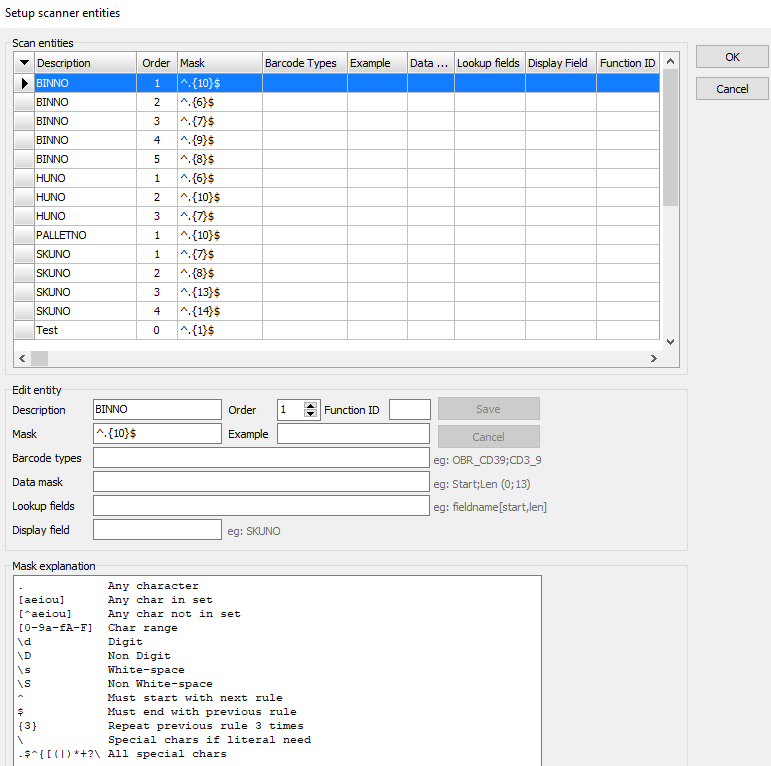
By right-clicking an entry in the Scan entities list, you can perform the following functions:
Edit
Click this to edit the selected scanner entity.
Edit the applicable Edit entity fields below the table of scanner entities and click Save to commit the changes.
Insert
Click this to add a new scanner entity. Complete the applicable Edit entity fields and click Save to create the entity.
Delete
Click this to delete the selected scanner entity. Click Yes at the confirmation pop-up screen to confirm.
Any changes made to scanner entities will only take effect on the next user assignment on the HHT. Users will have to re-assign before their HHT's will recognise the new settings.
Touch Screen Settings
To access the Touch Screen Settings screen, click on the Setup tab and then on Touch Screen Settings inside the drop-down menu.
The main screen displays the list of Touch UX Workstations in the database. Right-clicking an entry in the list allows the following functions to be performed:
Add
Click this to add a new workstation.
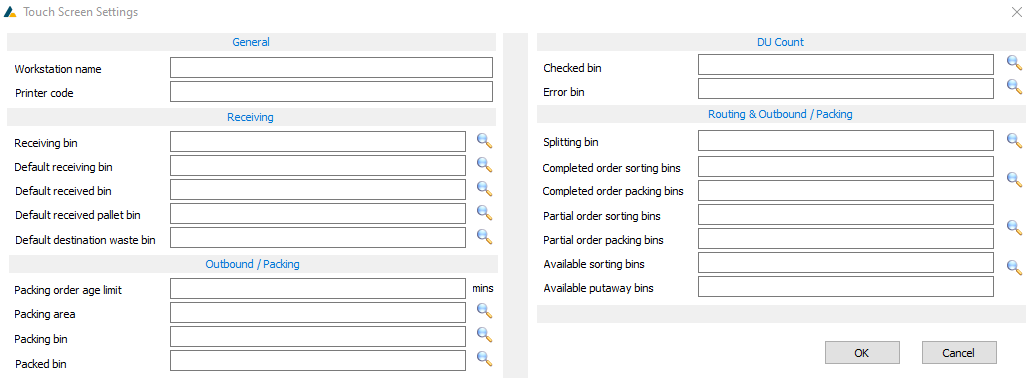
Complete the applicable fields and click OK to save your changes.
Any field with a magnifying glass icon next to it allows you to choose the bins from a list by clicking on the icon.
You can then select a bin from the drop-down list (Filter your search by Building or Area to make it easier) and click OK to select the bin.
Some fields in Routing & Outbound/Packing have one icon between two fields, because these fields are linked to each other.
Select your bin and then click the Add button below each section to add the bin to that specific section. The number of bins on each side must match. E.g. 2 bins on left = 2 bins on right. Click OK to add the bins.
Right-clicking a bin entry in this window will bring up options to change the bin order by moving the selected bin up or down in the list as well as to remove the bin from the list.
Edit
Click this to edit the selected workstation. Edit the applicable fields and click OK to save your changes.
Delete
Click this to delete the selected workstation. Click Yes at the confirmation pop-up screen to confirm this action.
Users
To access the Users screen, click on the Setup tab and then on Users inside the drop-down menu.
The Users screen displays the details of all AdOr5 users. The list can be sorted by selecting a sorting option from the drop-down list at the top of the screen and then clicking Show. Inactive users can also be hidden by checking this option before clicking Show. The status of inactive users is highlighted in red.
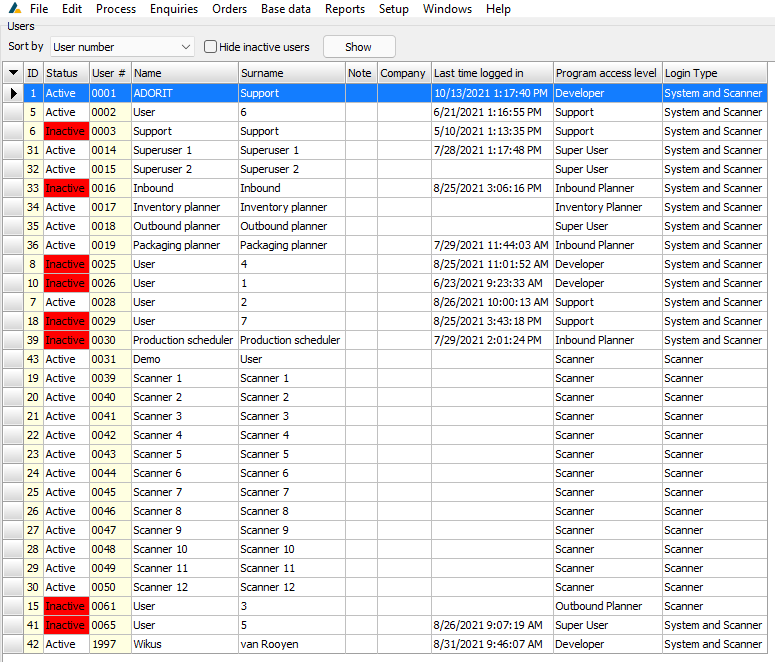
By right-clicking an entry in the list, the following functions can be performed:
New user
Click this to create a new user. Complete the applicable fields and then click OK to create the user.
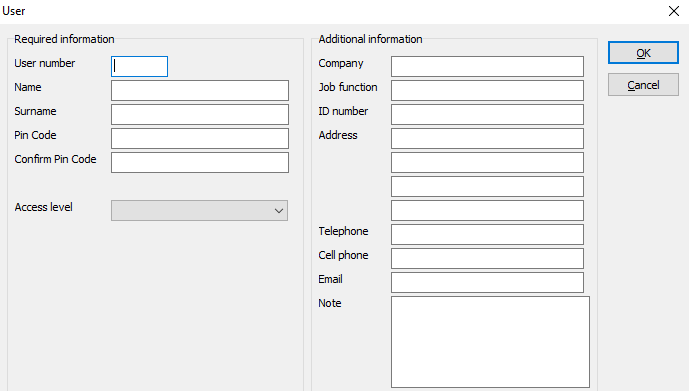
Once the user has been created, he/she will be assigned the default password "1234".
Edit user
Click this to edit the selected user. Edit the applicable fields and then click OK to commit your changes.
Delete user
Click this to delete the selected user. Click Yes at the confirmation pop-up screen to confirm.
Activate user
Click this to activate the selected inactive user
De-activate user
Click this to de-activate the selected active user.
User rights > Client access
Click this to access the Client access for the selected user.
By right-clicking an entry in the Client access table, the following functions can be performed:
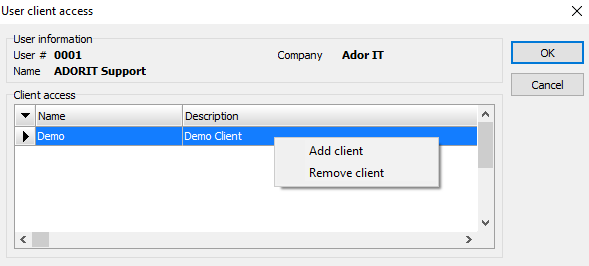
Add client
Select a client from the list and click OK to add it.
Remove client
Click this to revoke the user's access to the selected client. Click Yes at the confirmation pop-up screen to confirm the action.
Reset password
Click this to reset the selected user's password. Enter the new password and verify it, then click OK to confirm.
Access Levels
To access the Access Levels screen, click on the Setup tab and then on Access Levels inside the drop-down menu.
The main screen displays a list of access levels sorted by rank from 0 - 100. Right-clicking an entry in the list will allow you to perform the following functions:
New
Click this to create a new access level.
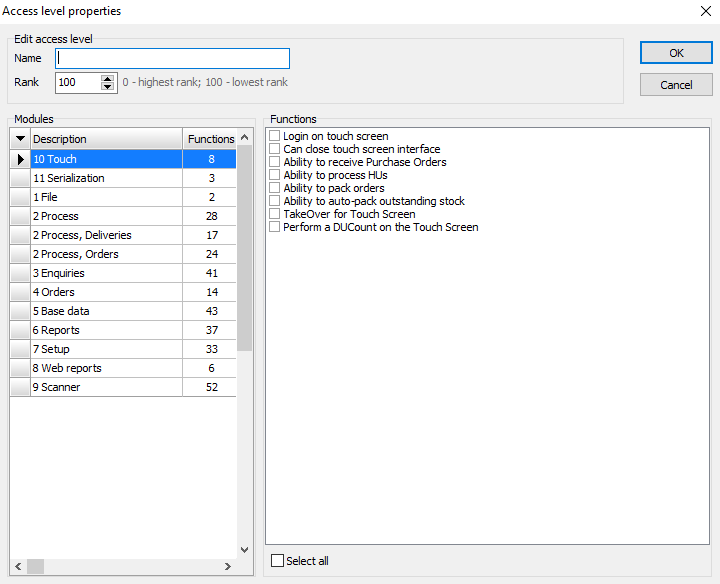
Give the access level a name as well as a rank based on the number and importance of functions that you wish to assign. Then select all the functions that you wish to assign from each module. To save your changes, click OK. To exit the screen without saving, click Cancel.
Edit
Click this to edit the selected access level. As with creating a new access level, select or de-select the applicable functions and click OK to save your changes.
Once an access level has been edited, the changes will only take effect on the next login. The same applies to the HHT. If a scanner access level is changed, the user must be re-assigned on the HHT before it will take effect.
Delete
Click this to delete the selected access level. Click Yes at the confirmation pop-up screen to confirm deletion.
Clients
To access the Clients screen, click on the Setup tab and then on Clients inside the drop-down menu.
To access Client settings, click on Clients in the Setup menu.
The main screen shows the list of Clients in the database.
Right-clicking an entry in the list will allow you to perform the following functions:
Add
Click this to add a new client.
Complete the applicable fields at the bottom of the screen and click Save.
Edit
Click this to edit the selected client. Edit the applicable fields and click Save to confirm your changes.
Delete
Click this to delete the selected client. Click Yes at the confirmation pop-up screen to confirm deletion.
Couriers
Accessing the Courier Settings
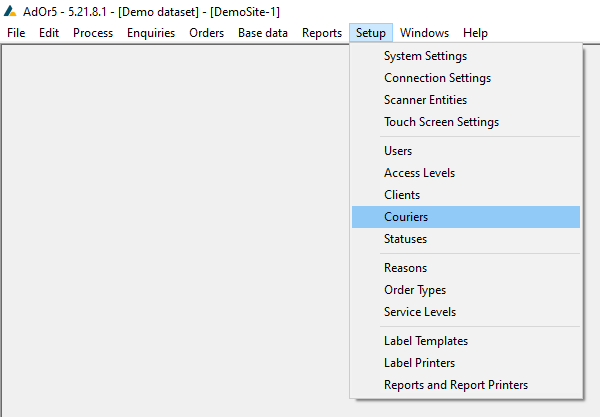
To access the Couriers screen, click on the Setup tab and then on Couriers inside the drop-down menu.
The Various Grids in the Couriers Screen
Couriers
This grid displays the list of Couriers and their details.
Despatch Labels
This grid allows you to manage what Despatch Labels are linked to your selected Courier.
Regions
This grid displays the Regions that the selected Courier services.
Destination Regions and Service Levels per Weight Range
This grid displays Destination Regions for the selected Region, and the dimension criteria for Service Level selection.
Locations
This grid displays Locations for the selected Region and their details.
Settings to enable Courier/Service Level Selection
In the Setup > System Settings menu, navigate to the Orders 2 tab and find the DU Confirm settings.
In these settings, ensure that the following setting is checked.
Select your Ship from Region from the drop-down box and enter the Stored Procedure name that will determine the Courier and Service Level. The Stored Procedure will be customised and provided by AdOrIT.
The Courier and Service Level will be determined based on the destination postal code of the order, as well as the weight and dimension of the DU when it is confirmed.
Add/Edit/Delete a Courier
In the Couriers grid, right-clicking an entry allows the following functions to be performed:
Add Courier
Click Add to add a new Courier.
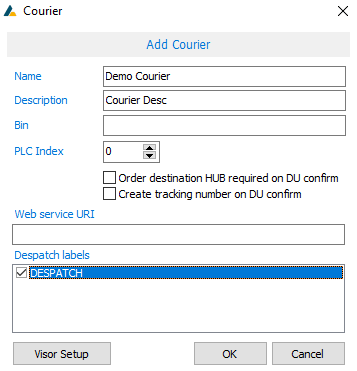
Complete all applicable fields and then click OK.
Name: Courier Code
Description: Full name/description of the Courier
Bin: Target Bin for DU Confirm, if setting is enabled to use the Courier Bin as the Target Bin during DU Confirm (System Settings > Orders 2 > DU Confirm)
PLC Index (Custom Setting): Kick-off gate number if using a PLC system
Checkboxes (Custom Settings): Toggles if an Order Destination HUB is required on DU Confirm and/or if Tracking Numbers are created during DU Confirm.
Web Service URI: If web service integration is used, the URI for the Courier's web service must be entered here.
Despatch Labels: Select which Despatch Labels are used for the selected Courier. This can be left unselected if a default label is used for all Couriers or if the label is determined by the Order Destination.
Edit Courier
Select a Courier, right-click it and then click Edit.
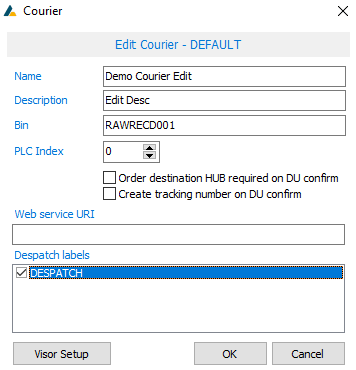
Edit the applicable fields and then click OK.
Delete Courier
Select a Courier, right-click it, and then click Delete to delete the Courier. A pop-up message will appear, asking if you are sure you want to delete the Courier and if yes is clicked, the Courier will be deleted.
If the Courier is linked to existing Orders, an error message will be displayed and the Courier will not be deleted.
Import Region Locations
Click this to import region locations from an external file.
Select the file (click "..." to browse) and check whether the file contains headers. Click Import to import the file.
Applying Despatch Labels to all Couriers
In the Despatch Labels grid, the Despatch Labels for the selected Courier are displayed.
Clicking the Apply to all button will apply the Despatch Labels for the selected Courier to all other Couriers.
Add/Edit/Delete a Region
In the Regions grid, right-clicking an entry allows the following functions to be performed:
Add Region
Click Add to add a new Region for the selected Courier.
Complete the applicable fields and click OK.
Edit Region
Right-click the selected Region and then click Edit to edit its details.
Edit the applicable fields and then click OK to save your changes.
Delete Region
Right-click the selected Region and then click Delete to delete it.
Click Yes at the confirmation pop-up box to complete the action. Please note that all destinations and service levels linked to the selected region will also be removed.
Setting up Destination Regions and Service Levels
In the Destination Regions grid, right-clicking an entry allows the following functions to be performed:

Add Single Destination
Click Add Single Destination and then select a Destination Region from the drop-down list. Click OK to complete the action.
Add Multiple Destinations
Click Add Multiple Destinations and then tick the regions that you want to add. To select all the available regions, you can tick the Select All box. Click OK to complete the action.
Remove Destination
Select the destination that you want to remove, right-click it and then click Remove Destination. To complete the action, click Yes at the confirmation pop-up box.
Set Weight and Service Level
Right-click the selected Destination and click Set Weight and Service Level. Enter the min/max weight and dimensions and select a Service Level from the drop-down box. Click OK to complete the action.
The weight and dimension parameters will determine the box size to be used to set the selected Service Level to the order.
Remove Weight and Service Level
Right-click the selected destination and then click Remove Weight and Service Level to remove these settings from the destination. Click Yes at the confirmation pop-up box to complete the action.
Add/Edit/Delete Locations
In the Locations grid, right-clicking an entry allows the following functions to be performed:
Add Location
Click Add and then complete the applicable fields. Click OK to complete the action.
Edit Location
Right-click the selected Location and then click Edit. Edit the applicable fields and click OK to save your changes.
Delete Location
Right-click the selected location and then click Delete. Click Yes at the confirmation pop-up box to confirm the action.
Reasons
To access the Reasons screen, click on the Setup tab and then on Reasons inside the drop-down menu.
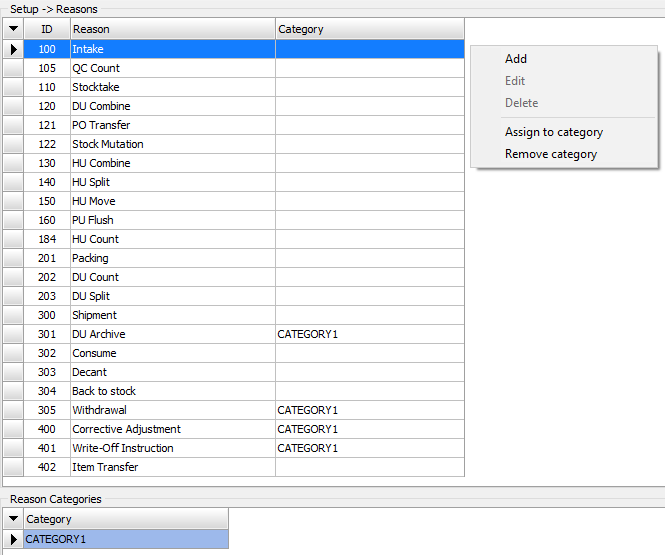
The standard set of reasons is greyed out and cannot be edited. Custom reasons that have been added will appear in black text and can be edited. Right-clicking an entry in the list allows the following functions to be performed:
Add
Click this to add a new reason. Enter its description in the Description field and click Save.
Edit
Click this to edit the selected reason. Once you have edited its description, click Save to commit the changes.
Delete
Click this to delete the selected reason. Click Yes at the confirmation pop-up screen to confirm.
Assign to category
Click this to assign the selected reason to a category.
Select a reason from the drop-down list and click OK.
Remove category
Click this to remove the category from the selected reason. Click Yes at the confirmation pop-up screen to confirm this action.
Reason Categories
In the Reason Categories pane at the bottom of the screen, you can see a list of categories in the database.
Right-clicking an entry in the list will allow the following functions to be performed:
Add
Click this to add a new category. Enter its description in the Description field and click Save.
Edit
Click this to edit the selected category. Once you have edited its description, click Save to commit the changes.
Delete
Click this to delete the selected category. Click Yes at the confirmation pop-up screen to confirm.
Order Types
To access the Order Types screen, click on the Setup tab and then on Order Types inside the drop-down menu.
The main screen displays all order types in the database. Right-clicking an entry in the list will allow you to perform the following functions:
Add
Click this to add a new order type. Complete the applicable fields at the bottom of the screen and click Save.
Edit
Click this to edit the selected order type. Edit the applicable fields at the bottom of the screen and click Save to confirm your changes.
Delete
Click this to delete the selected order type. Click Yes at the confirmation pop-up screen to confirm deletion.
Service Levels
To access the Service Levels screen, click on the Setup tab and then on Service Levels inside the drop-down menu.
The main screen displays all service levels in the database. Right-clicking an entry in the list will allow you to perform the following functions:
Add
Click this to add a new service level. Complete the applicable fields at the bottom of the screen and click Save.
Edit
Click this to edit the selected service level. Edit the applicable fields at the bottom of the screen and click Save to confirm your changes.
Delete
Click this to delete the selected service level. Click Yes at the confirmation pop-up screen to confirm deletion.
Label Templates
To access the Label Templates screen, click on the Setup tab and then on Label Templates inside the drop-down menu.
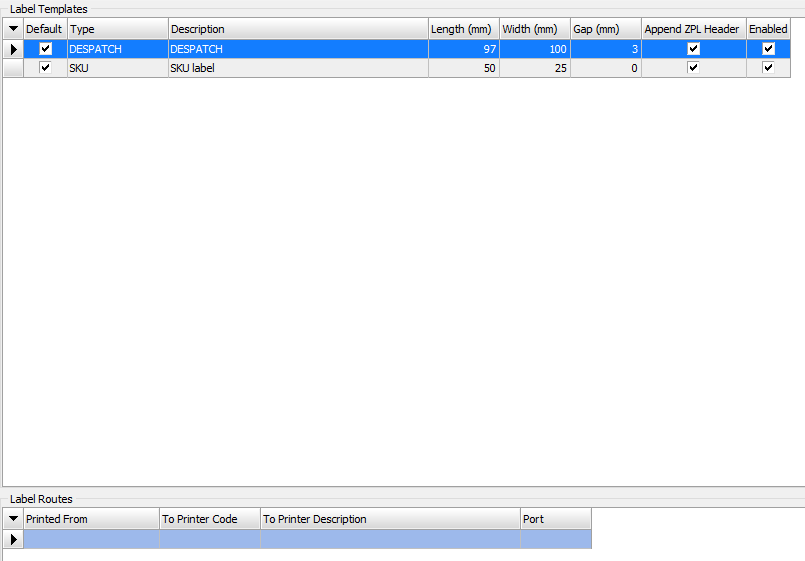
The Label Templates pane at the top of the screen displays all label templates in the database. Right-clicking an entry in the list allows the following functions to be performed:
New
Click this to add a new label template.
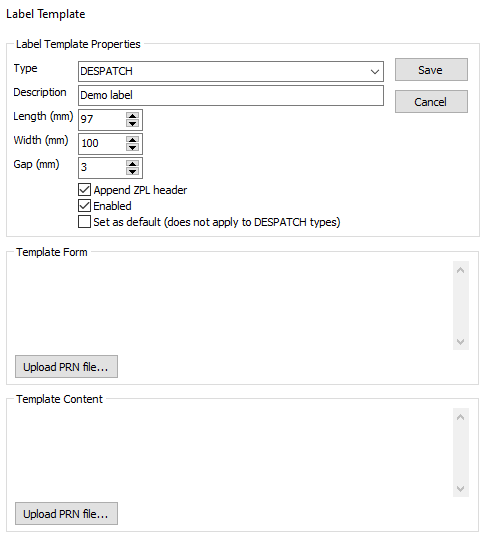
Complete all applicable fields and then upload the PRN files for the label.
The Template Form is non-compulsory. This is only applicable where the printer setup calls for a form to be permanently loaded to the printer and the data fields to be updated each time.
The Template Content is compulsory. If a template form is used, this field loads the content that is updated on each print. If no template form is used, this field loads the entire template to be updated on each print.
Click Upload PRN file to select a file. Choose the file you wish to upload and click Open.
Once all applicable fields have been completed, click Save to create the template.
Edit
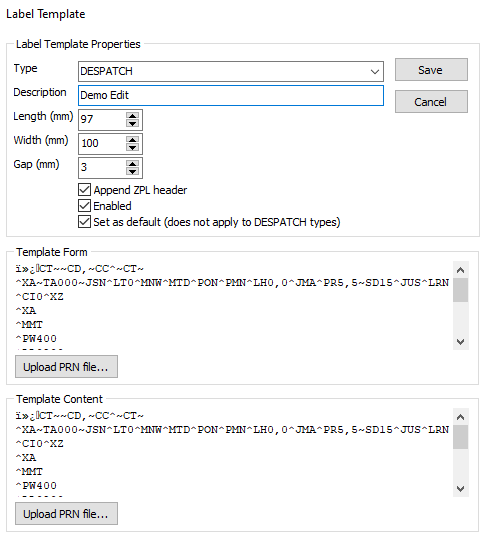
Click this to edit the selected label template. Edit the applicable fields and click Save to commit the changes.
Delete
Click this to delete the selected label template. Click Yes at the confirmation pop-up screen to confirm.
Set as default
Click this to set the selected label as the default label for its type.
Print test label
Click this to print a test label for the selected label.
Label Routes
The Label Routes pane at the bottom of the screen shows all printer routes assigned to the selected label template. Right-clicking an entry in the list allows the following functions to be performed:
Add route
Click this to add a printer route for the selected label template.
Select a label printer for the label to print to and click Save to add the route.
Remove route
Click this to remove the selected route from the selected template. Click Yes at the confirmation pop-up screen to confirm.
Label Printers
To access the Label Printers screen, click on the Setup tab and then on Label Printers inside the drop-down menu.

The screen will display a list of label printers. Right-clicking an entry in the list allows the following functions to be performed:
Add
Click this to add a new label printer.
Complete all applicable fields at the bottom of the screen and click Save to add the printer.
Edit
Click this to edit the selected label printer. Edit the applicable fields and click Save to commit changes.
Delete
Click this to delete the selected label printer. Click Yes at the confirmation pop-up screen to confirm deletion.
Clear print queue
Click this to clear the print queue for the selected printer. Click Yes at the confirmation pop-up screen to confirm this action.
Reports and Report Printers
To access the Reports and Report Printers screen, click on the Setup tab and then on Reports and Report Printers inside the drop-down menu.
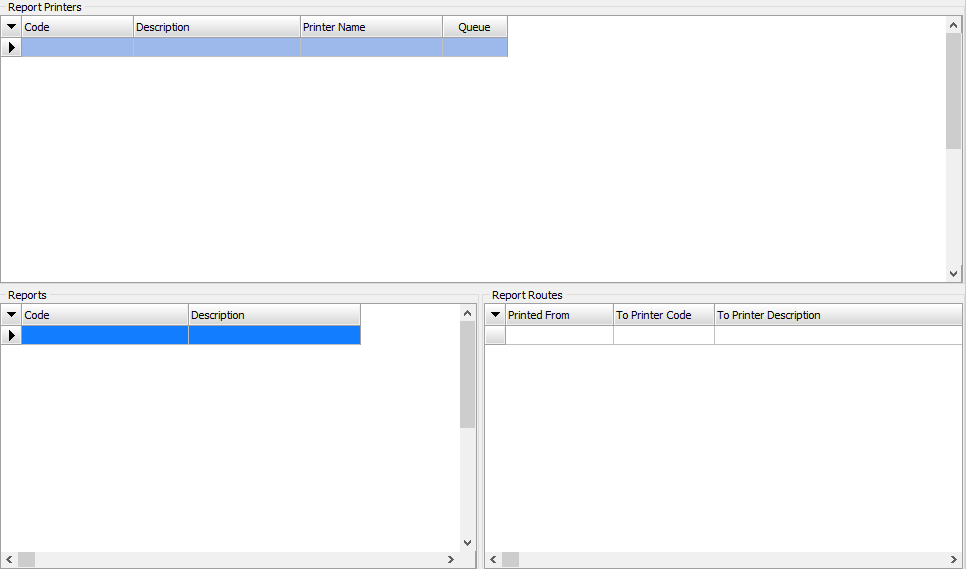
The screen displays information of Report Printers, Reports and Report Routes.
Right-clicking an entry in the Report Printers pane at the top of the screen will allow you to perform the following functions:
Add
Click this to add a new report printer.
Complete all applicable fields and click Save.
Edit
Click this to edit the selected report printer. Edit the applicable fields and click Save to commit changes.
Delete
Click this to delete the selected report printer. Click Yes at the confirmation pop-up screen to confirm deletion.
Clear print queue
Click this to clear the print queue for the selected printer. Click Yes at the confirmation pop-up screen to confirm this action.
Reports
Right-clicking an entry in the Reports pane (bottom-left) allows the following functions to be performed:
Add
Click this to add a new report.
Complete all applicable fields and click Save. To browse for a report data file, click "..." and select the file to be used.
Edit
Click this to edit the selected report. Edit the applicable fields and click Save to commit changes.
Delete
Click this to delete the selected report. Click Yes at the confirmation pop-up screen to confirm.
Report Routes
Right-clicking an entry in the Report Routes pane (bottom-right) allows the following functions to be performed:
Add Route
Click this to add a new printer route for the selected report.
Select a report printer and then click Save.
Remove Route
Click this to remove the selected route. Click Yes at the confirmation pop-up screen to confirm.
Labels Configuration Fields
Despatch Label
The following fields can be added to a Despatch Label:
[orderno]
[destno]
[destname1]
[destname2]
[destaddress1]
[destaddress2]
[destcity]
[destpostalcode]
[destcountrycode]
[destcontact]
[desttelephone]
[salesorg]
[ordertypedesc]
[couriername]
[courierdesc]
[servicelevelcode]
[desthub]
[desttowncode]
[note1]
[shipfromdate]
[destref]
[destref2]
[despatchdate]
[huno]
[trackingno]
[seqno]
[destref-seqno]
[ducount]
[duqty]
[huweight]
[dimcode]
[eandata]
[techindex]
[clientname]
[sizedesc]
[colourdesc]
[packqty]
[refno]
[depno]
[styledesc]
[printdate]
[printdatetime]
Pallet Label
The following fields can be added to a Pallet Label:
[palletno]
[deliveryid]
[asnno]
[hucount]
[printdate]
HU Label
The following fields can be added to a HU Label:
[huno]
[palletno]
[printdate]
[note1]
[note2]
[note3]
[colourcode]
Shipment Label
The following fields can be added to a Shipment Label:
[shipmentdesc]
[ordertypedesc]
[shipmentref1]
[shipmentref2]
[shipmentref3]
HU Product Label
The following fields can be added to a HU Product Label:
[huno]
[huweight]
[hucreated]
[unitqty]
[routedesc]
[skuno]
[depno]
[typeno]
[typedesc]
[stcode]
[printdate]
[packqty]
Product Pallet Label
The following fields can be added to a Product Pallet Label:
[palletno]
[depno]
[typeno]
[skuno]
[styleno]
[styledesc]
[sizecode]
[sizedesc]
[colourcode]
[colourdesc]
[costprice]
[itematt1]
[itematt2]
[hucount]
[huweight]
[printdate]
SKU Label
The following fields can be added to a SKU Label:
[groupno]
[depno]
[typeno]
[typedesc]
[styleno]
[styledesc]
[skuno]
[colourcode]
[colourdesc]
[sizecode]
[sizedesc]
[sizesort]
[packqty]
[costprice]
[sellprice]
[productweight]
[productcube]
[seasoncode]
[timeperiod]
[suppliertype]
[suppliername]
DU Label
The following fields can be added to a DU Label:
[duno]
[dimcode]
[orderno]
[priority]
[binno]
DU Summary Label
The following fields can have added to a DU Summary Label:
[orderno]
[priority]
[dimcode]
[dimqty]
Label Templates
To access the Label Templates screen, click on the Setup tab and then on Label Templates inside the drop-down menu.
Adding and editing label templates
The Label Templates pane at the top of the screen displays all label templates in the database. Right-clicking an entry in the list allows the following functions to be performed:
New
Click this to add a new label template.
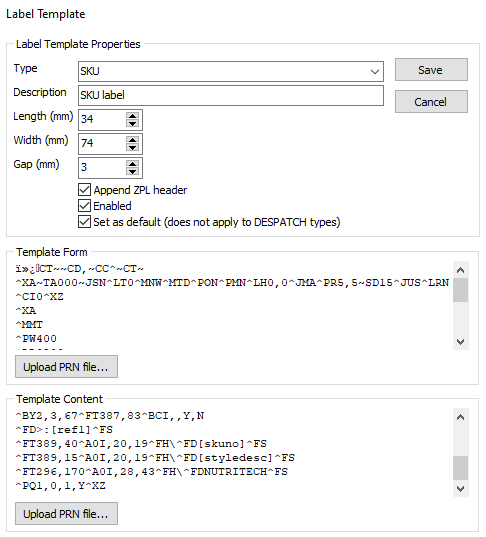
Complete all applicable fields and then upload the PRN files for the label.
The label type can be selected from the drop-down list. Different types of labels are printed at different stages of the warehousing process. Please refer to section 7 to see what AdOr database fields are compatible with each label type.
Note that Despatch labels do not have to be set as default, as AdOr5 allows for several Despatch label templates to be used, based on courier, order destination, etc.
The Template Form is non-compulsory. This is only applicable where the printer setup calls for a form to be permanently loaded to the printer and the data fields to be updated each time.
The Template Content is compulsory. If a template form is used, this field loads the content that is updated on each print. If no template form is used, this field loads the entire template to be updated on each print.
Click Upload PRN file to select a file. Choose the file you wish to upload and click Open.
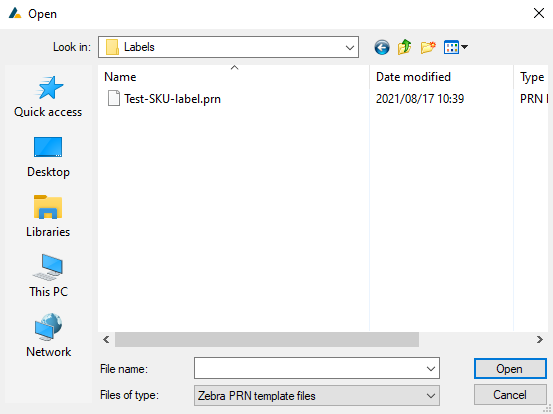
Once all applicable fields have been completed, click Save to create the template.
Edit
Click this to edit the selected label template. Edit the applicable fields and click Save to commit the changes.
Delete
Click this to delete the selected label template. Click Yes at the confirmation pop-up screen to confirm.
Set as default
Click this to set the selected label as the default label for its type.
Print test label
Click this to print a test label for the selected label.
Adding and removing label printing routes
The Label Routes pane at the bottom of the screen shows all printer routes assigned to the selected label template. Right-clicking an entry in the list allows the following functions to be performed:
Add route
Click this to add a printer route for the selected label template.
Select a label printer for the label to print to and click Save to add the route. The "Print from" field is automatically filled using your PC's name.
Remove route
Click this to remove the selected route from the selected template. Click Yes at the confirmation pop-up screen to confirm.
Printing labels
The AdOr5 Label Printer application
In order to print any labels from AdOr5, you must have AdOr5 Label Printer running on the client PC that you are printing from.
Open the application and click Start if auto-start is not already enabled.
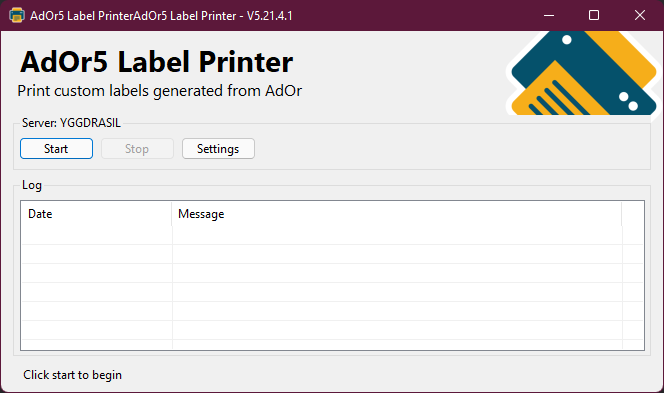
To edit the application's settings, click the Settings button.
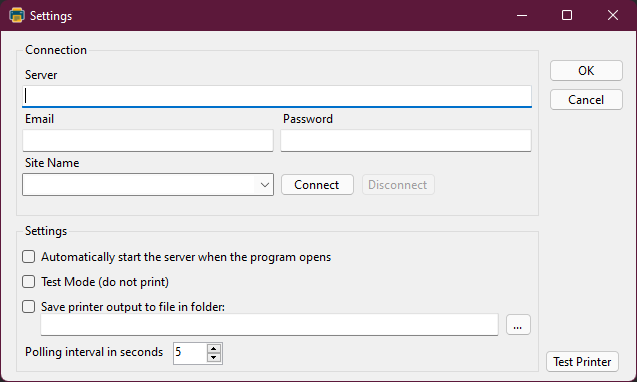
In order for your prints to be successful, you must ensure that the Database path and credentials are correct.
Printing Despatch Labels
Despatch Labels can be printed at DU Confirm (Process > Orders > DU Confirm) -- To print a despatch label without confirming a DU, you can right-click the DU entry in the DU Lookup table and click Print Despatch Label.

Printing SKU Labels
SKU Labels can be printed in any screen that displays SKU information, such as Enquiries > Inventory or Enquiries > HU's. Select the SKU from the table that you wish to print a label for and then click Edit > Print SKU Labels.
If your selection does not include the required fields for an SKU label, the following message will display informing you of what fields are required:
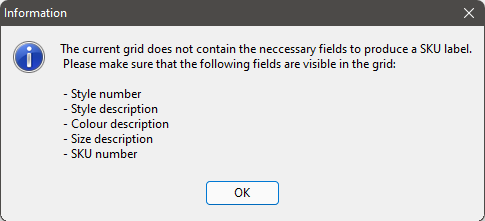
If your selection includes the required fields, you can then select your print options as per the screenshot below.
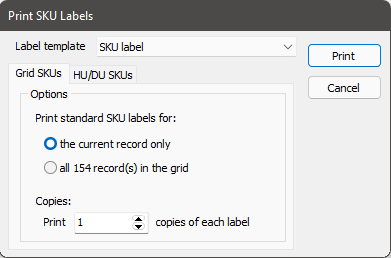
Once you have set your options, click Print.