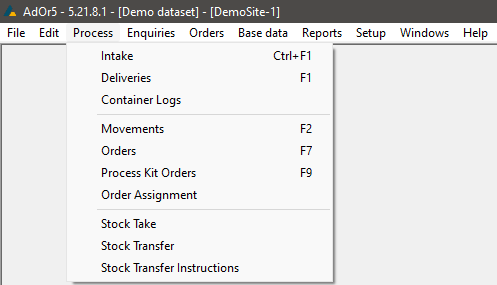
Process
We are in the process of porting our user manual, this page might contain incorrect information.
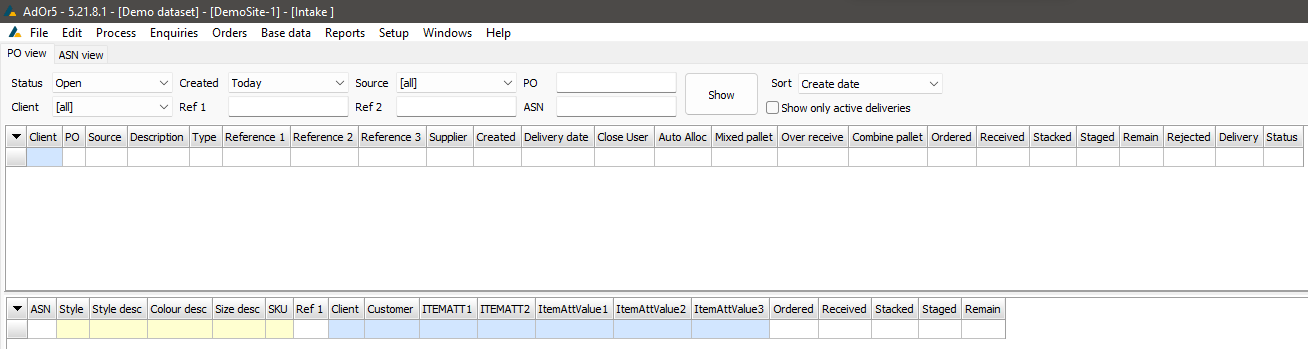
Intake
To view the Intake screen, click Intake in the Process menu. You can also use the keyboard shortcut Ctrl + F1.
Note on the intake screen there are two Tabs, PO view and ASN view. The screen will by default open up on the PO view.
PO View
To view Purchase Orders (POs), filter as per the applicable fields at the top of the screen and click Show
Right-click an entry on the PO header to display a menu with the available functions.

Below you will find the feature and description of the options found when the user right clicks in the PO header level table.
Schedule Delivery
When selected, the instruction starts with a pop-up screen where you instruct AdOr on when the goods are to arrive to which door, how it will be packaged and if there is any additional details that need to be logged for the specific PO
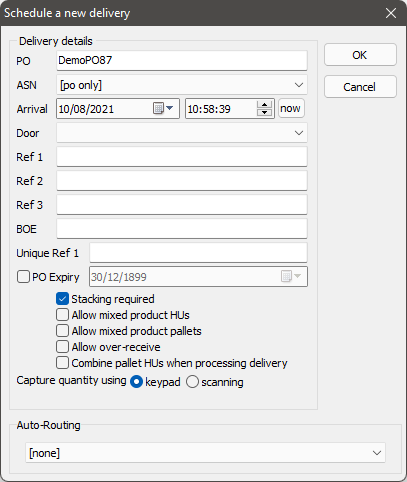
After clicking Schedule Delivery from the right-click menu, select a delivery door from the Door drop-down list and complete the applicable fields. Check the applicable rules as well as the quantity capturing method, then click OK to confirm.
If you do not wish to schedule a delivery, click Cancel to go back.
To check if your PO is scheduled copy the PO number and navigate your way to the delivery screen. Paste the PO in the PO filter box. Click show and the scheduled PO will now be displayed in your Delivery screen for the next process steps.
Explode PO BOMs
When selected, the instruction takes the parent article and extrapulates it into the children articles if selected. A parent can have multiple children which intern removes the parent line and inserts the child articles on a PO

After clicking Explode PO BOMs from the right click menu, you will see a message box informing you of how many BOM items were exploded

Looking back to the detail grid, you will now see that the parent articles have been replaced with their respective children articles

Close PO
To close a PO, right-click the applicable entry and click Close PO. You will be prompted to confirm closing the PO. Click on Yes to close the PO or on No to cancel the operation.

Re-open PO
To re-open a close PO, right-click the applicable entry and click Re-open PO. You will be prompted to confirm closing the PO. Click on Yes to close the PO or on No to cancel the operation.

This process is applicable to selected sites only and will not work for everyone.
Toggle Auto Allocate
The toggle tool used to enable/disable auto allocating the stock when a delivery is accepted

ASN View
To view ASNs, filter as per the applicable fields at the top of the screen and click Show.
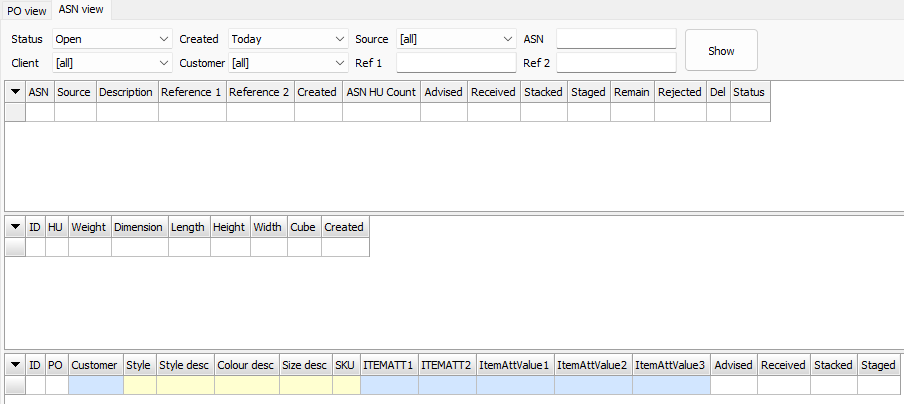
Right-click an entry on the PO header to display a menu with the available functions.

Below you will find the feature and description of the options found when the user right clicks in the PO header level table.
Close ASN
To close an ASN, right-click the applicable entry and click Close ASN. You will be prompted to confirm closing the ASN. Click on Yes to close the ASN or on No to cancel the operation.

Re-open ASN
To re-open a close ASN, right-click the applicable entry and click Re-open ASN. You will be prompted to confirm closing the ASN. Click on Yes to re-open the ASN or on No to cancel the operation.

This process is applicable to selected sites only and will not work for everyone.
Deliveries
To open the Deliveries screen, click Deliveries in the Process menu or press F1 on your keyboard.
Delivery Header
To view deliveries, filter as per the applicable fields at the top of the screen and click Show.
Right-click an entry on the Delivery header to display a menu with the available functions.

Below you will find the feature and description of the options found when the user right clicks in the PO header level table.
- Start delivery
- Enable online receiving
- Auto-receive ASN delivery
- Hold for QC
- Edit delivery
- Delivery offloads
- Process delivery by pallet
- Process delivery by item
- Accept delivery
- Cancel delivery
- Print delivery invoice
- Print pallet label
- Print HU labels for pallet
- Print batch GRN
Start delivery
To start a delivery, right-click the applicable entry and click Start delivery. You will be prompted to confirm starting the delivery. Click on Yes to start the delivery or on No to cancel the operation.

Once a delviery is started, popup menu for the delivery will be updated to enable functions that can only be executed once a delivery has been started.

Enable online receiving
Once the delivery has been started, click this to enable online receiving. A tick will now be displayed next to this option and this delivery will be able to be received using an HHT. To disable online receiving, click Enable online receiving again.

Auto-receive ASN delivery
To start a delivery, right-click the applicable entry and click Auto-receive ASN delivery.
Hold for QC
To hold the selected delivery for QC, click Hold for QC. Right-clicking the entry again will show a tick next to this option. To release it from this state, click Hold for QC again.
This stock will be in "On Hold" status when the delivery is accepted and will only become available after it has been checked and released from QC.
Edit delivery
To edit the details of a delivery, click Edit delivery. This will open the Edit delivery form. Update the applicable fields and click OK after editing to save your changes.
Delivery offloads
To view, add, remove or edit delivery offloads for a delivery, click Delivery offloads. This will open the Delivery offloads form.
To add a new delivery offload, click on Add and complete the fields displayed below the list. Once the fields have been completed, click Save to save your changes or Cancel to hide the fields.
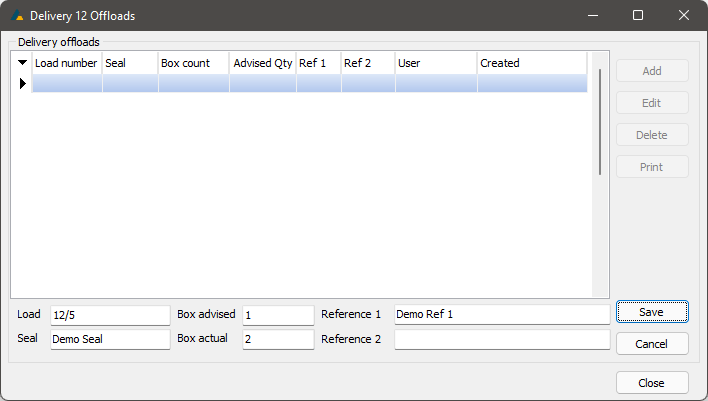
To edit a delivery offload, select it from the list and click Edit. Edit the applicable fields below the list and click Save to save your changes or Cancel to hide the fields.
To remove a delivery offload, click Delete.
To print a delivery offload, select the entry and click Print. Alternatively right click on the entry in the grid and click Print offload

Click Close to exit the screen.
Process delivery by pallet
To process the delivery by pallet, click Process delivery by pallet. This will open the Process Delivery by pallet form.
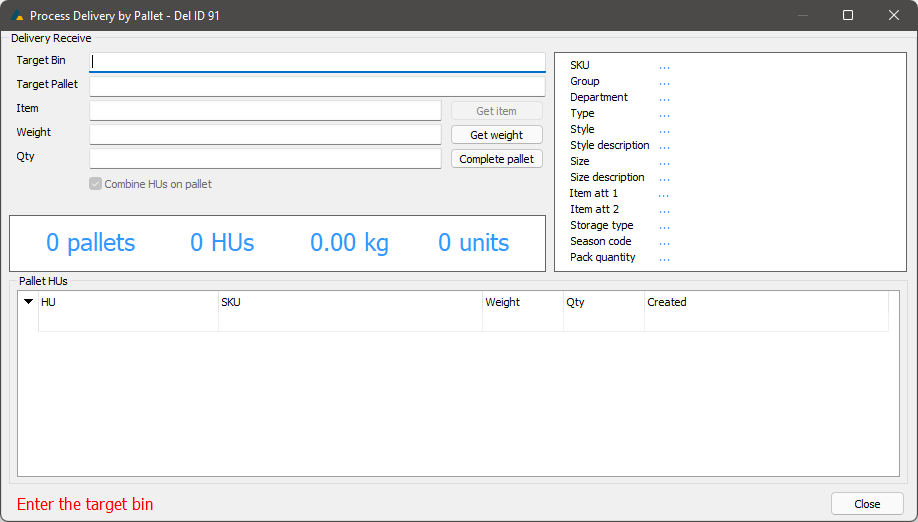
Complete the required fields by means of scanning or manual capturing.
A Storage Type must be set in the Product Master for the products that you intend on receiving, in order for this receiving method to work.
Click Close to exit the screen.
Process delivery by item
To process the delivery by item, click Process delivery by item. This will open the Process Delivery by Item form.
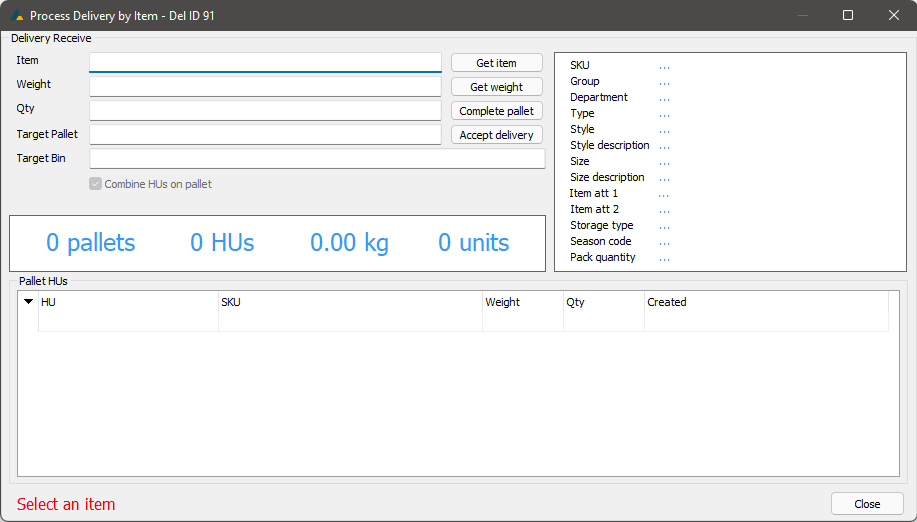
Complete the required fields by means of scanning or manual capturing.
A Storage Type must be set in the Product Master for the products that you intend on receiving, in order for this receiving method to work.
Click Close to exit the screen.
Accept delivery
Click this to accept the selected delivery.
To accept a delivery, right-click the applicable entry and click Accept delivery. You will be prompted to confirm accepting the delivery. Click on Yes to accept the delivery or on No to cancel the operation.

If nothing has been received against the delivery, you will be prompted to cancel the delivery instead.

Cancel delivery
To cancel a delivery, right-click the applicable entry and click Cancel delivery. You will be prompted to confirm cancel the delivery. Click on Yes to cancel the delivery or on No to cancel the operation.

If the delivery already has stock received against it, you will be informed that the delivery can not be canceled.

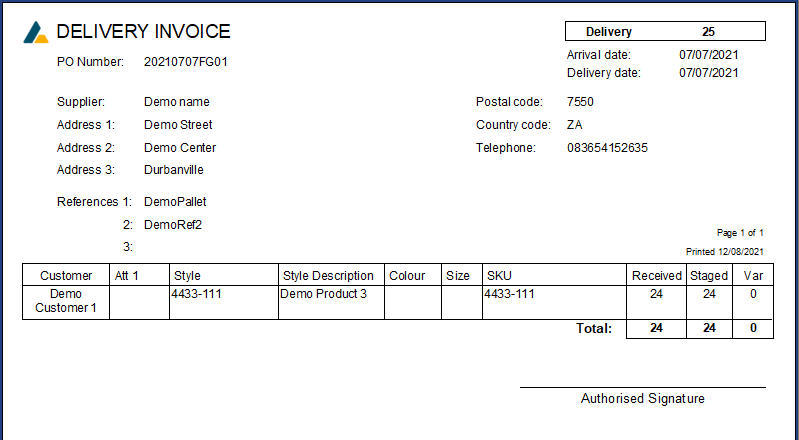
Print delivery invoice
Click this to print a delivery invoice. Click Preview to preview it before printing. To print the invoice, click Print.

Print pallet label
Click this to print the pallet label for the selected delivery. The Pallet number is taken from the Reference 1 field.
Print HU labels for pallet
Click this to print HU labels for the pallet for the selected delivery. The Pallet number is taken from the Reference 1 field.
Print batch GRN
Click this to print a batch GRN.
Transactions
When selecting a delivery, the Intake Summary is populated with all SKUs in that delivery. When selecting an SKU from the Intake Summary list, you can see any transactions against that particular SKU.
![]()
Stock on hand
As per the Transactions tab, this allows you to see details regarding stock on hand of the selected SKU.
If the delivery has not been accepted yet, the following functions can be performed by right-clicking an entry in the table:
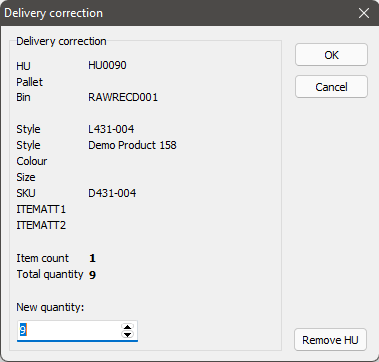
Delivery Correction
Clicking this displays the details of the selected stock and allows the user to edit the quantity. Clicking Remove HU will remove the entire HU, which can allow it to be received again correctly or not received at all, if it was not meant to be part of the selected delivery.
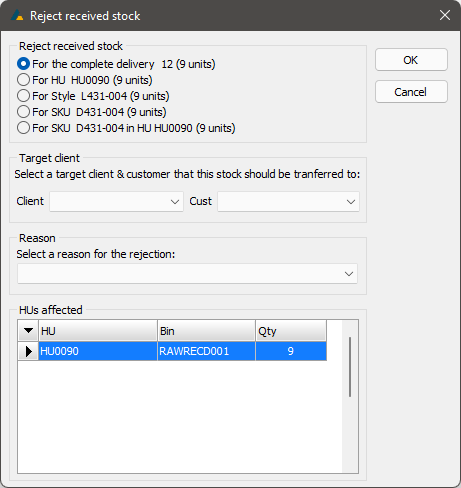
Reject Stock
To reject the received stock, select which exact stock must be rejected (all stock, specific HU, specific style, etc.), then select the Client and Customer the stock will be transferred to (normally a Rejects or Returns type), then select a reason for the rejection. Press OK to confirm this action.
Movements
To process inventory movements, click Movements in the Process menu. You can also press F2 on your keyboard to access this screen.
To view movements, filter as per the applicable fields at the top of the screen and click Show.
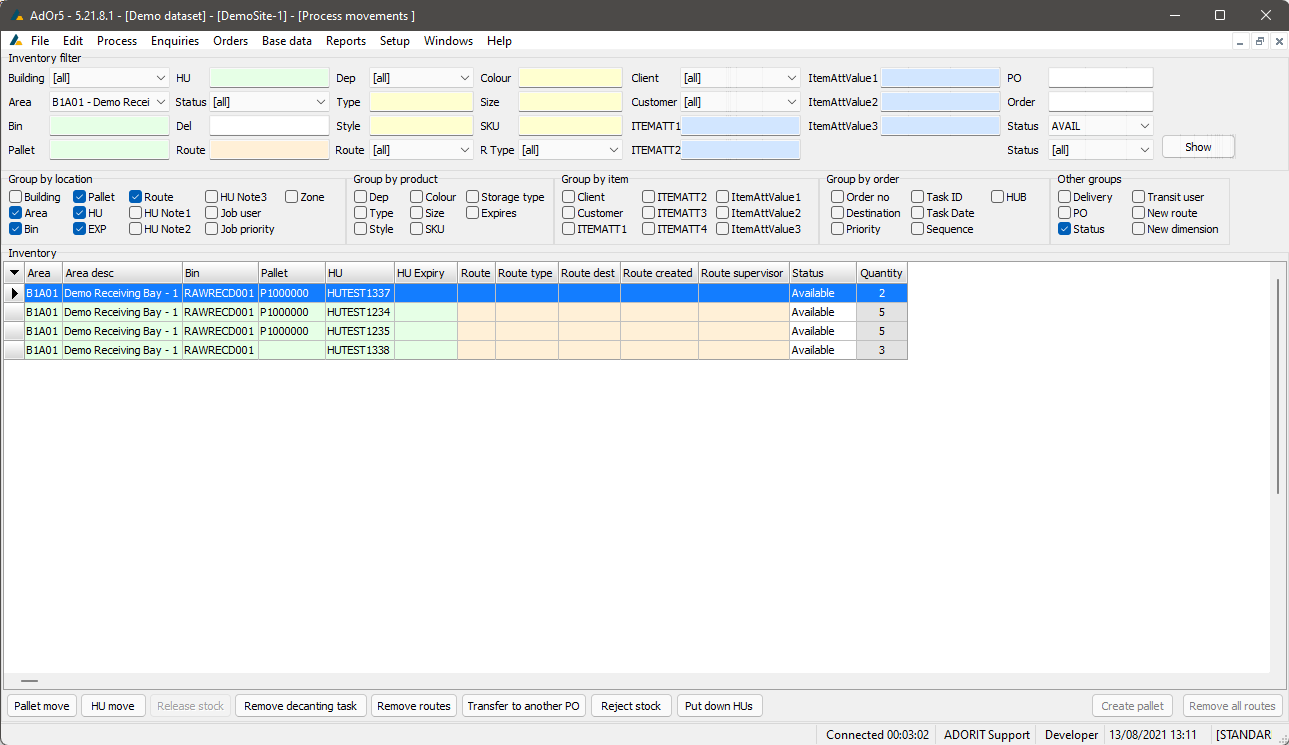
Select and right-click an HU on to display a menu with the available functions.

Below you will find the feature and description of the options found when the user right-clicks in the grid.
- Assign to user
- Assign to priority
- Remove user
- Remove priority
- Assign route to user
- Assign route to priority
- Remove route user
- Remove route priority
- Print bin contents
- Print pallet labels
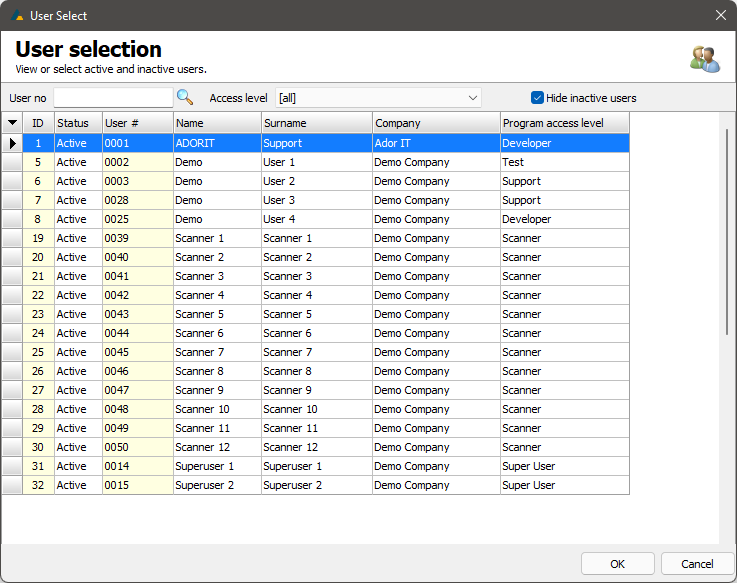
Assign to user
Click this to assign the HU to a user. Select the user from the list and click OK. In this screen you can also search for a specific user by entering their User No. or filter according to various access levels. The option to hide/show inactive users is also available.
Assign to priority
Clicking this allows the user to assign a priority to the job. Enter the numerical value of the priority and click OK to confirm.

Remove user
Click this to remove the assigned user. Click Yes on the confirmation pop-up screen to confirm.
Remove priority
Click this to remove the priority assigned to this job. Click Yes on the confirmation pop-up screen to confirm.
Assign route to user
Click this to assign a route to a user. Select the user from the list and click OK. This uses the same screen detailed in Assign to user.
Assign route to priority
Click this to assign a route to priority. Enter the numerical value of the route priority and click OK. This uses the same screen detailed in Assign to priority.
Remove route user
Click this to remove the user from the selected routes. Click Yes on the confirmation pop-up screen to confirm.
Remove route priority
Click this to remove the priority from the selected routes. Click Yes on the confirmation pop-up screen to confirm.
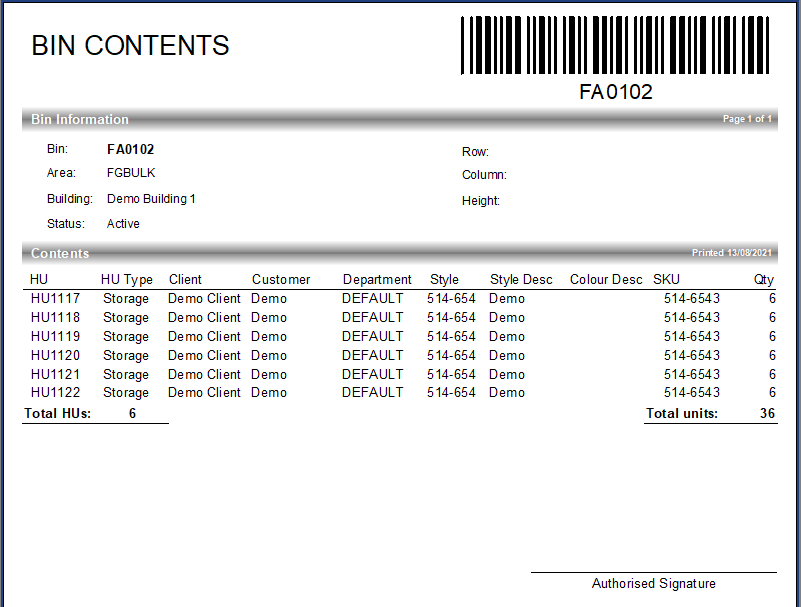
Print bin contents
Click this to print the contents of the selected bin. Click Preview to preview the document. Click Print to print the document.
Print pallet labels
Click this to print pallet labels. Type or select the number of copies to be printed and click Print to print them.
Action Buttons
The action buttons on the bottom of the screen allows the user to perform actions on the selected items in the grid.
The following functions can be created by selecting contents from the list and clicking the action buttons at the bottom of the screen.
- Pallet move
- HU move
- Release stock
- Remove decanting task
- Remove routes
- Transfer to another PO
- Reject stock
- Put down HU's
Pallet move
Click this to create a Pallet Move route from the stock's current location to another. You can move it to either a VNA area or area by clicking the applicable radio button and selecting the area from the drop-down list. Click OK to create the route.

HU move
Click this to create an HU Move route from the HU's current location to another. You can either create a replenishment job or move it to an area by clicking the applicable radio button and selecting the area from the drop-down list. Click OK to confirm.

Release stock
If the stock is on hold for QC, click this to release the selected stock and make it available. Be sure to first enable the Delivery group in the "Other groups" section at the top of the screen.

Remove decanting task
Click this to remove a decanting task from the selected HU.
Remove routes
Click this to remove any routing instructions from the selected HU. Note that only user-generated routes can be removed (e.g. HU Move, Pallet Move). System-generated routes, such as Demand RPL, cannot be removed.
Transfer to another PO
Click this to transfer the stock from one PO to another. Enter the PO ID that you wish to transfer to and click OK.
Reject stock
Select the lines the user would want to reject and click the Reject Stock button.
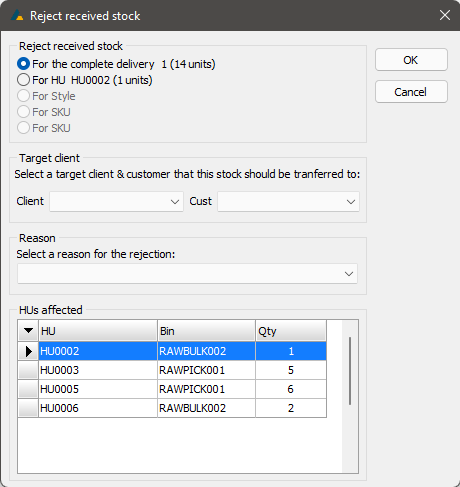
A dialog box will pop up providing the following options
For the complete delivery (delivery number) (number of units rejected)
- When selecting complete delivery, the entire list of HU in the selected delivery will display in the HU affected List
For HU (HU number)
- When selecting "HU" only the HU selected will display on the HU's Affected list
For style
- When selecting "Style" only the HU with the selected "Style" will display on the HU's Affected list
For SKU
- When selecting "SKU" only the HU with the selected "SKU" will display on the HU's Affected list
Select the target client on the Client drop down list
Select the customer
Select the reason in the drop-down list
Click OK and a dialog box will pop-up to confirm your instruction to reject stock Yes if the user wants to continue to reject stock. Both dialog boxes will close the stock will change to available status under the new Customer
No will close the dialog box and take you back to the "Reject received stock" dialog box click cancel and the dialog box will close.
Put down HU's
Click this to put down selected HU's that are in transit.
Orders
To access the Orders screen, click Orders in the Process menu or press F7 on your keyboard.
Note on the Orders screen there are five Tabs, Orders, DU Despatch, Pallet Despatch, DU Confirm and Shipment. The screen will by default open up on the Orders view.
Orders
Filter the information as per the applicable fields at the top of the screen and then click Show to view the orders.
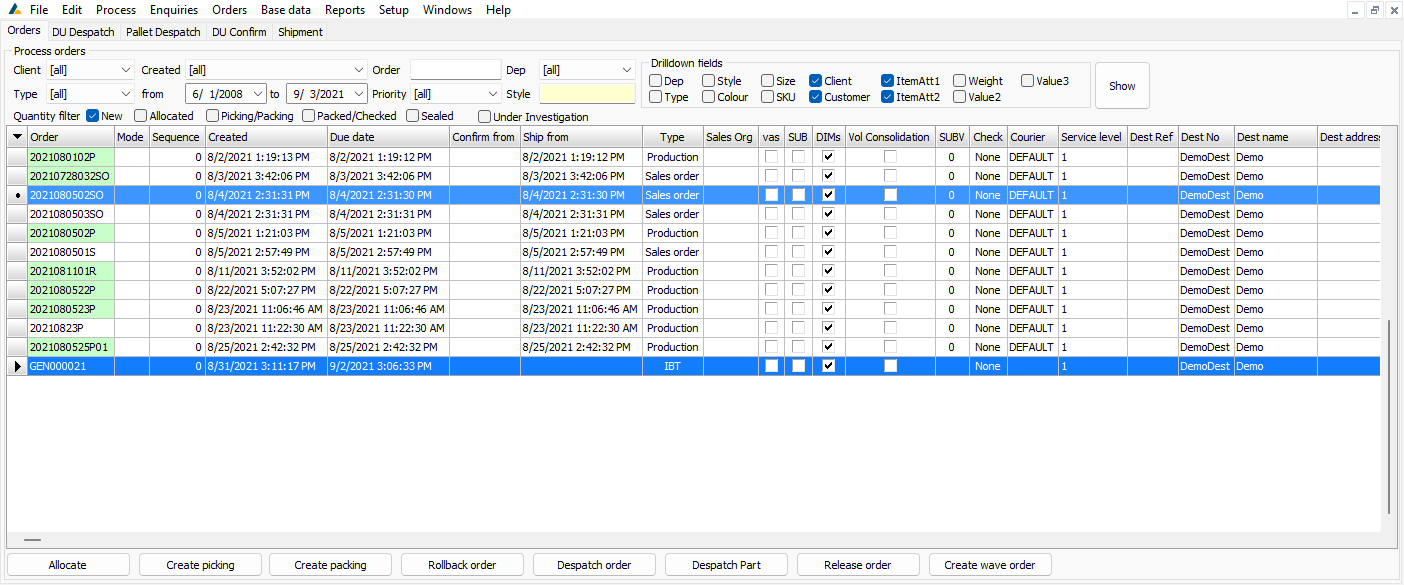
Select the applicable order from the list and right-click it to access the following functions:
Manual allocates
Clicking Manual allocate will open a new screen where you can manually allocate the selected order (See 6.6 for instructions).
Edit VAS
Click this to edit the VAS for the order. Type in the VAS information in the text field and click OK to save your changes. Clicking Cancel will exit the screen without saving any changes. You can also print the VAS by clicking Print.

Print VAS
Click this to print the VAS for the order. Click Generate to confirm the print instruction. This will create an Excel document with the VAS instructions.

Activate sub-pack
Click this to activate the selected order's sub-pack. Right-click the available sub-pack you wish to use and then click Activate sub-pack.
Volume Consolidation
Click this to consolidate the volume of the order. Various order functions can be performed by clicking the action buttons at the bottom of the screen.
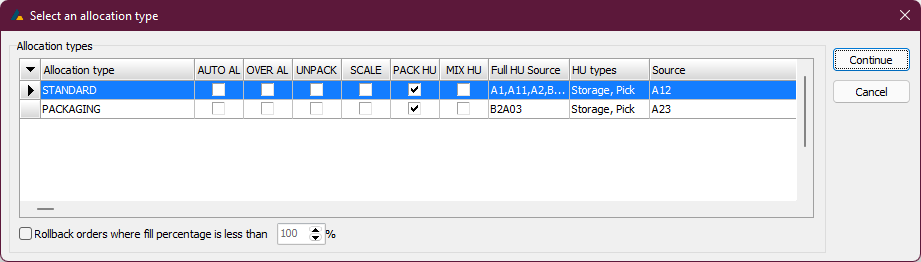
Allocate
Click this to allocate the selected order. Select the allocation type and click Continue. Should you wish to partially allocate, tick Rollback orders where fill percentage is less than and enter the applicable fill percentage that must be allocated in order for the order to not be rolled back.
In the Order Allocation Completed screen that opens up, click on the order to view its details. Clicking on an SKU in the Order Detail field will display inventory details in the Inventory field. Click Commit to confirm the allocation of the order. If you wish to roll back the order, click Rollback. To export the order allocation details as a CSV file, click Export grid.

Create picking
Click this to create a picking instruction for the selected order. The order must have stock in Pick Ready status for picking to be created.
Create packing
Click this to create a packing instruction for the selected order. The order must have stock in Pick Ready status for packing to be created.
Rollback order
Click this to roll back the selected order. Click OK then click Yes on the second confirmation pop-up screen to confirm. Note that only allocated and pick ready stock can be rolled back.
Despatch order
Click this to despatch a packed and/or checked order.
Release order
Click this to release a packed and/or checked order.
Create wave order
Click this to create a wave order.
DU Despatch
In the DU Lookup pane, you can filter by DU or Order. Click Show to show your filtered search or click Show packed to show all packed DUs.
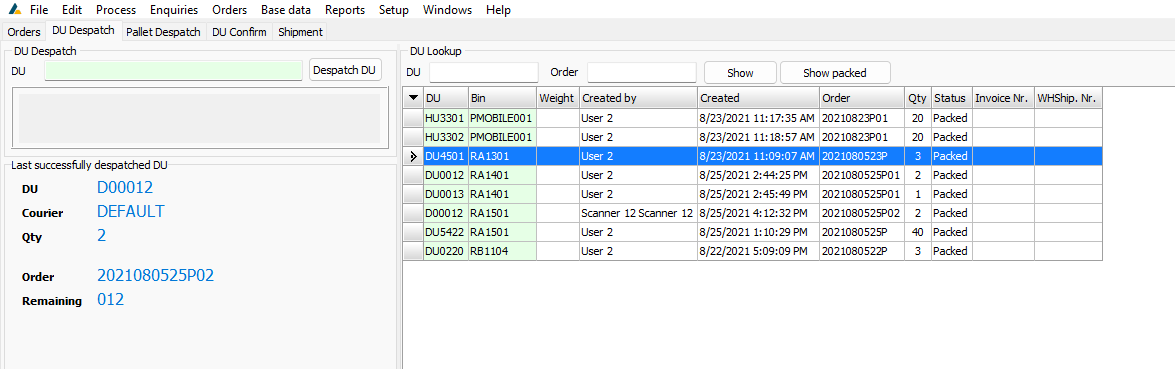
Reprint despatch labels
Select a DU from the DU lookup list, right-click it and then click Reprint despatch labels to reprint the despatch labels for the selected DU.
Despatch DU
To despatch a DU, enter the DU number in the DU field and then click Despatch DU.
Pallet Despatch
In the Pallet Lookup pane, you can filter by Pallet or Order. Click Show to show your filtered search or click Show packed to show all packed Pallets.
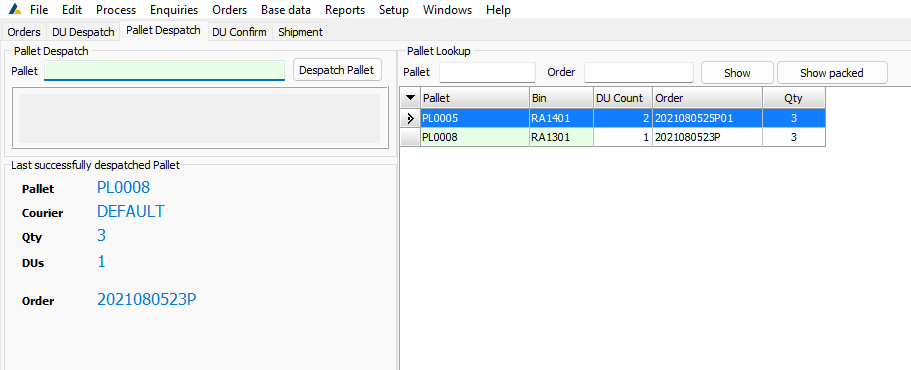
Despatch Pallet
To despatch a Pallet, enter the Pallet number in the Pallet field and then click Despatch Pallet.
Label Print Options

Print last Pallet label(s)
Click this to print the Pallet labels for the last confirmed Pallet.
Print label(s) for specific Pallet
Click this to print labels for a specific DU. After clicking, enter the Pallet number and then click OK.
Print labels for selected Pallet(s)
Select one or more Pallets from the DU Lookup pane and then click Print labels for selected Pallet(s) to print their labels.
Print label(s) for specific Order
Click this to print labels for a specific order. After clicking, enter the order number and then click OK.
DU Confirm
In the DU Lookup pane, you can filter by DU, Order or Area. Click Show to show your filtered search or click Show un-confirmed to show all un-confirmed DUs.
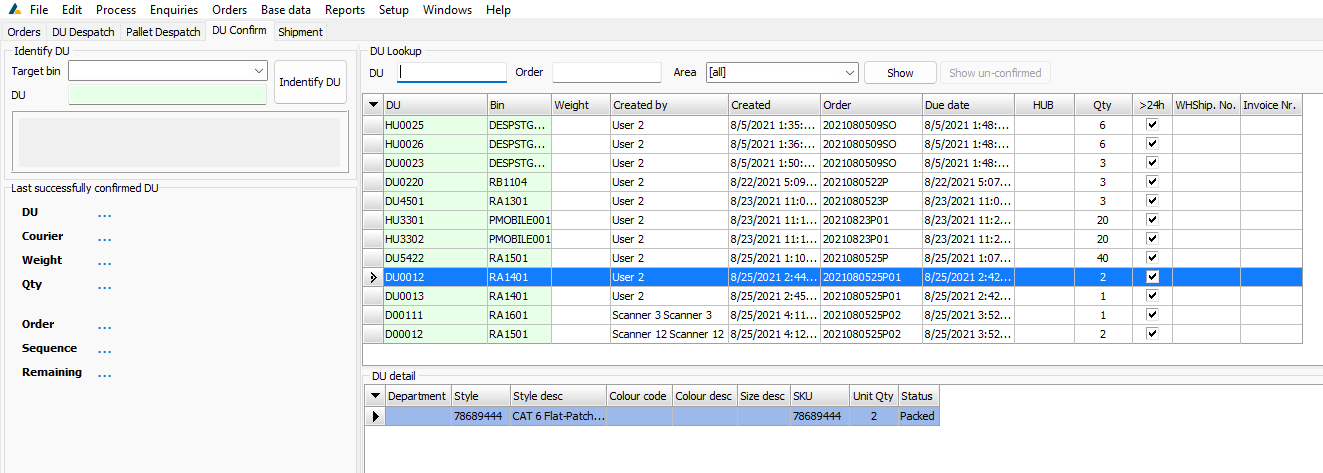
Print/reprint despatch labels
Select a DU from the DU lookup list, right-click it and then click Print/reprint despatch labels to print the despatch labels for the selected DU.
Print confirmation note
Select a DU from the DU lookup list, right-click it and then click Print confirmation note to print the confirmation note for the selected DU.
Identify DU
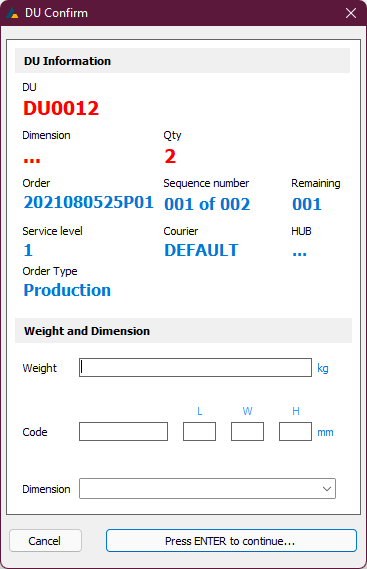
To identify and confirm a DU, enter the DU number in the DU field and then click Identify DU.

After confirming the DU information, press Enter on your keyboard, or click Press ENTER to continue...
Label Print Options

Print last DU label(s)
Click this to print the DU labels for the last confirmed DU.
Print label(s) for specific DU
Click this to print labels for a specific DU. After clicking, enter the DU number and then click OK.
Print labels for selected DU(s)
Select one or more DUs from the DU Lookup pane and then click Print labels for selected DU(s) to print their labels.
Print label(s) for specific Order
Click this to print labels for a specific order. After clicking, enter the order number and then click OK.
Shipment
In the Open Shipments pane, you can enter the Shipment number or filter by date created and then click Show to populate the table.
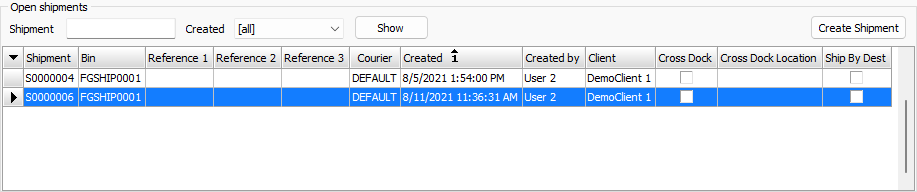
Select an open shipment and right-click it to perform the following actions:
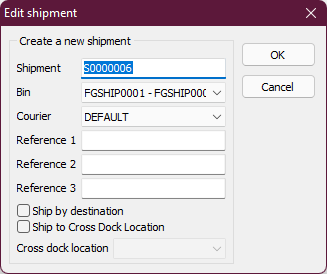
Edit shipment
Click this to edit the selected shipment. Click OK to confirm your changes or Cancel to exit the editing screen without saving changes.
Delete shipment
Click this to delete the selected shipment.

View destinations
Click this to view the destination details of the selected shipment.

Complete shipment
Click this to complete the selected shipment. If the reference fields are blank, you will be asked if this is acceptable. Click Yes to continue. Then click Yes again at the confirmation pop-up box to complete the shipment.

In the Unshipped DUs pane, enter a Bin, Order or Pallet number in the applicable fields and then click Show to show those specific DUs. By leaving the fields blank and clicking Show, the list will be populated with all unshipped DUs.
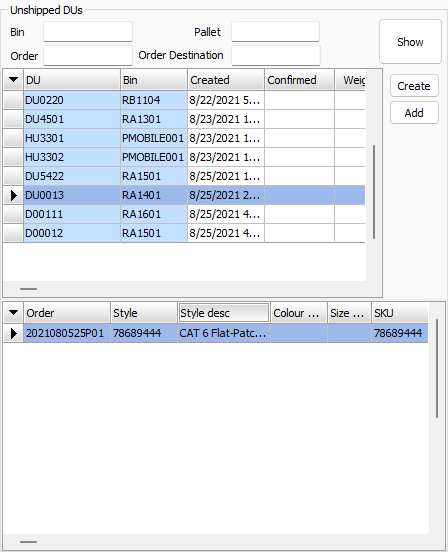
Create
Select one or more unshipped DUs and click Create to create a new shipment.
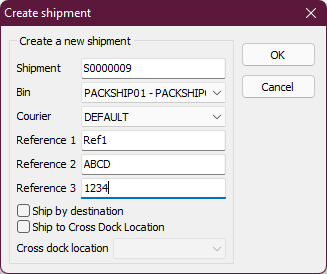
Complete the applicable fields in the Create Shipment pop-up box and then click OK.
Add
To add more DUs to the selected shipment, select one or more unshipped DUs and then click Add. Click Yes at the confirmation pop-up box to confirm this action.

Remove DU from shipment
Select a DU from the DU(s) on this shipment pane. Right-click it and then click Remove DU from shipment and click Yes at the confirmation pop-up box to remove the selected DU from the shipment.

Ship by destination
Ship by destination setup
Primary Actors
Planner/Admin
Set Unpack & Shipment bin
Preconditions
The ADOR5 unpack & shipment bin must be set before an ADOR5 order can be received in order for the destination bin to populate correctly
When a location is set up no manual unpack bin can be assigned in the orders "edit multiple order" screen
Ensure the "use enhanced scaling and unpack (flow through) allocation" is ticked to ensure orders are allocated using the unpack feature when an unpack bin is assigned in the location table.
Ship by Destination Process Steps
The setting up of the ship by destination function is in the location table on the right-hand panel. Note two tabs are now displayed where previously, the right-hand panel only had one.
Planner/Admin
ADOR5 -> Base data -> Locations >
Find and select the destination location to set a shipment bin
Right-click on location
Select "Set shipment bin"
Creating shipment by destination
Primary Actors
Planner/Admin
Create Shipment
Manage shipments
Load planning
Operator
Consolidate on the HHT
Ship on the HHT
Preconditions
The ADOR5 shipment bin must be set before an ADOR5 order can be received in order for the destination bin to populate correctly
Creating the shipment must be flagged as a ship by destination shipment
Other Rules
- If the order does not have a unpack bin set the user is to first set the unpack bin and edit the order in the HUB column by pasting the unpack bin as the hub.
Ship by Destination Process Steps
The ship by destination is broken up into two by operating independently. Consolidate by hub and flagging the shipment as a ship by destination.
Planner/Admin
ADOR4 -> Process -> Orders -> Shipments
Select create shipment
Select the shipment bin using the dropdown
- Add references within the reference field if required
Select the ship by destination tick box
Select ok
Select the created shipment to highlight the shipment
Right click in the Shipment destinations grid and add a destination
Repeat to the required list of destinations
Operator
If the order is a ship by destination order the following steps is to ensure HUB consolidation is executed correctly.
ADOR5 Mobile Client -> Shipment -> Consolidate -> Consolidate by HUB>
Scan source HU
Scan Destination Bin
The suggested bin will display guiding the user where to scan it
- Continue until task is complete
Process Kit Orders
To process kit orders, click on Process Kit Orders in the Process menu or press F9 on your keyboard.
In the Kit Orders pane, you can filter the list by Building and Area.
Select Order
Click on the kit order to be processed and click Select Order. Scan the Bin, Pallet, DU and SKU, and enter the quantity to complete the kit order. Multiple Kit Orders can be completed by bypassing the select order step and completing the fields, entering the quantity (1 unit = 1 kit order) and clicking Complete.
Refresh
Click Refresh to refresh the list of orders with the latest data. You can also set the auto-refresh rate by updating the Auto-refresh every * seconds field to the left of the Refresh button. Make sure that you check the box next to this to enable auto-refresh.
Order Assignment
By Order
The list of orders can be filtered by checking the applicable boxes at the top of the screen and clicking Refresh. The list can be updated with the latest information by clicking Refresh.
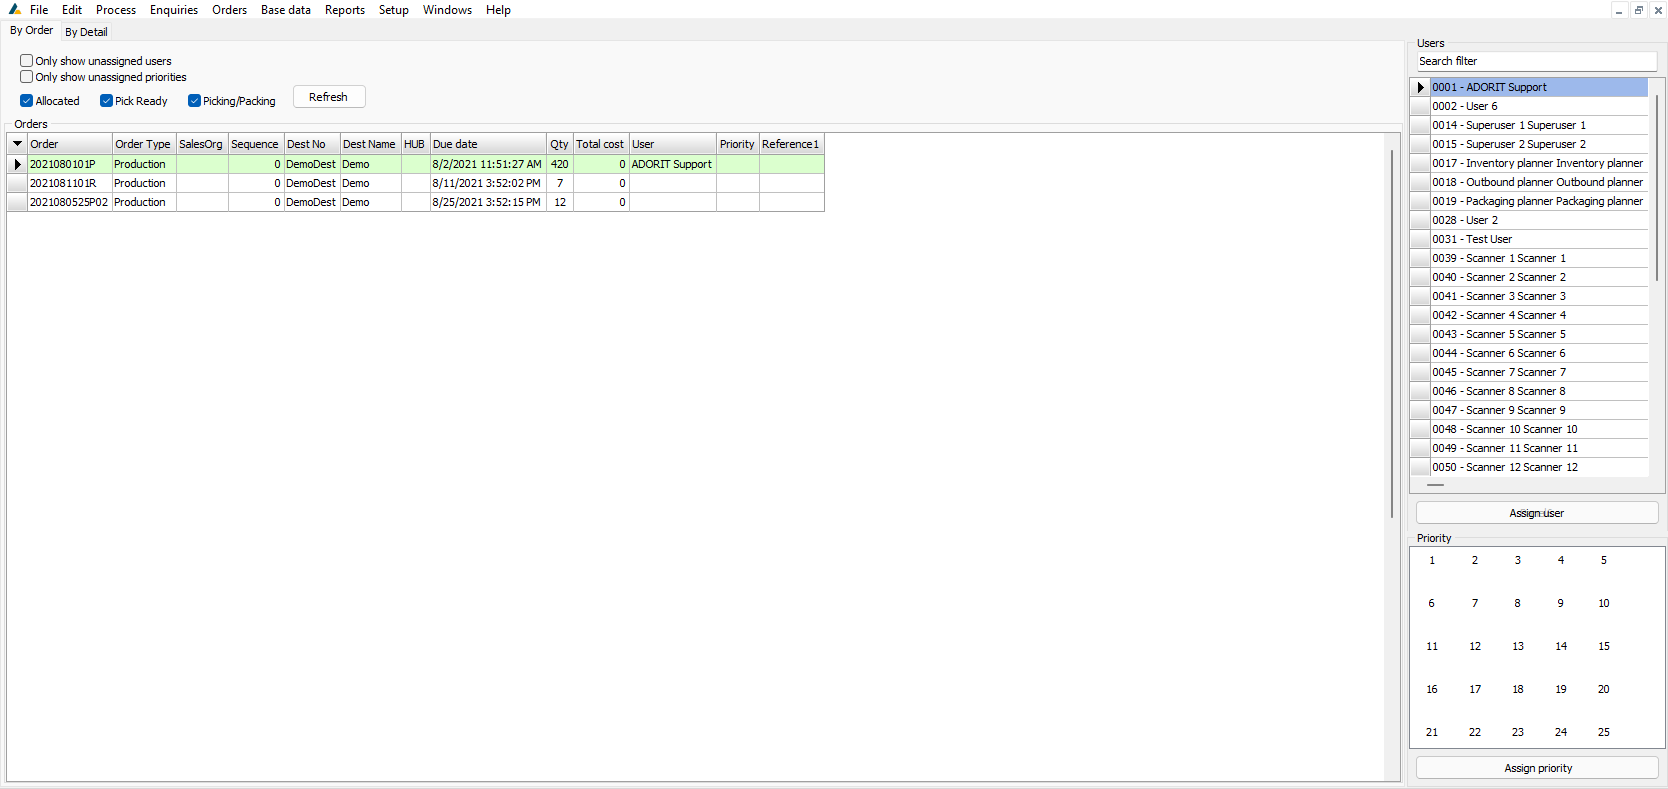
By selecting an order and right-clicking it, the following functions can be performed:

Remove user
Click this to remove the currently assigned user from the selected order. Click Yes at the confirmation pop-up box to confirm this action.
Remove priority
Click this to remove the currently assigned priority from the selected order. Click Yes at the confirmation pop-up box to confirm this action.
View job history
Click this to view the job history of the selected order.

In the Users pane, you can type a user's name or User Number in the Search filter field to find a specific user.
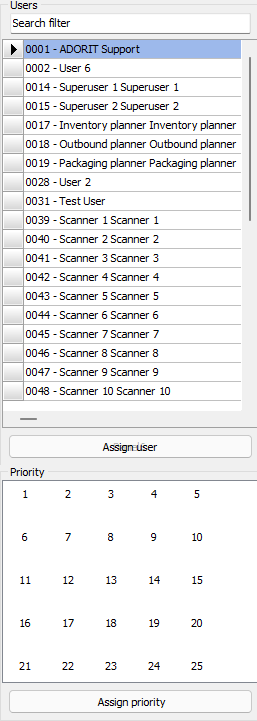
Assign user
Select an order from the Orders pane. Then select a user in the Users pane. To assign the user to the selected order, click Assign user.
Assign priority
Select an order from the Orders pane. Then select a priority in the Priority pane. To assign the priority to the selected order, click Assign priority.
By Detail
The list of orders now shows details of each SKU in the order. The same functions can be performed as in the By Order screen.
Stock Take
To view the Stock, take screen, click Stock take in the Process menu.
Add Bins to Stocktake
Filter the list of bins by the applicable fields at the top of the screen and then click Show.
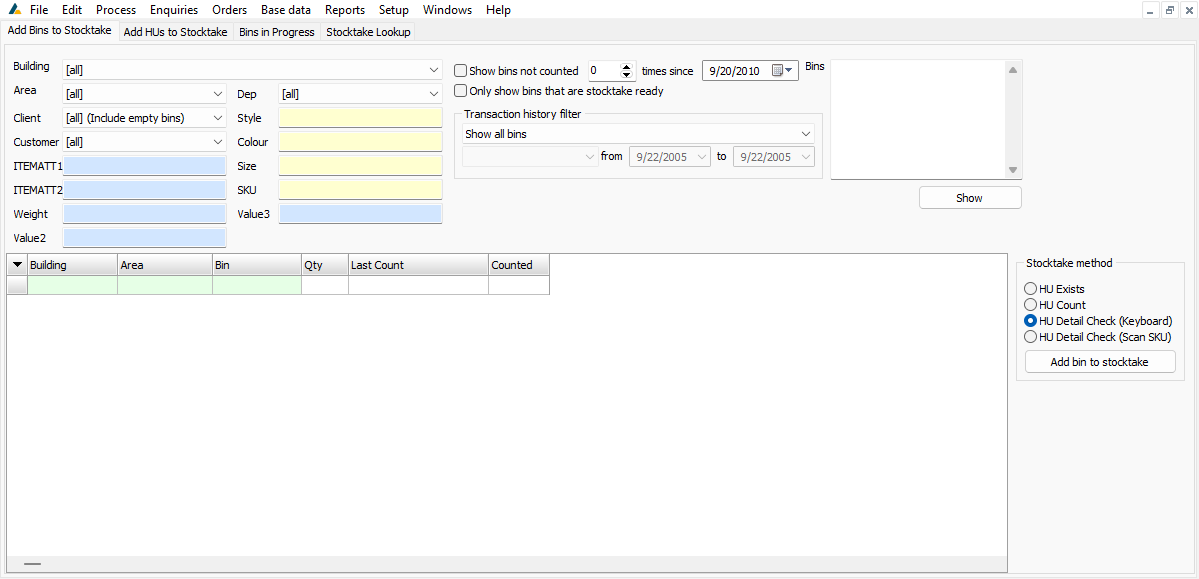
Add bin to stocktake
Select one or more bins from the list and select a stocktake method. Then click Add bin to stocktake to add the selected bins to stocktake. Click Yes at the confirmation pop-up box to proceed.

Add to stock take
Alternatively, you can select a bin from the list, right-click it and then click Add to stock take. Click Yes at the confirmation pop-up box to proceed. Make sure that you first select a stocktake method before adding the bins to stocktake.
Add HUs to Stocktake
Filter the list of HUs by the applicable fields at the top of the screen and then click Show.
Add HU to stocktake
Select one or more HUs from the list and select a stocktake method. Then click Add HU to stocktake to add the selected HUs to stocktake. Click Yes at the confirmation pop-up box to proceed.
Add to stock take
Alternatively, you can select a HU from the list, right-click it and then click Add to stock take. Click Yes at the confirmation pop-up box to proceed. Make sure that you first select a stocktake method before adding the HUs to stocktake.
Bins in Progress
You can filter the list of bins in progress by selecting the applicable fields at the top of the screen and clicking Show.
After selecting a bin from the list, you can perform the following functions by clicking one of the action buttons on the right of the screen:
Release from stocktake
Click this to release the selected bin from the stocktake and apply the active snapshot. Click OK at the confirmation pop-up box to confirm.
Assign to user
Click this to assign the selected bins stocktake task to a user. Select a user from the list and then click OK to confirm.
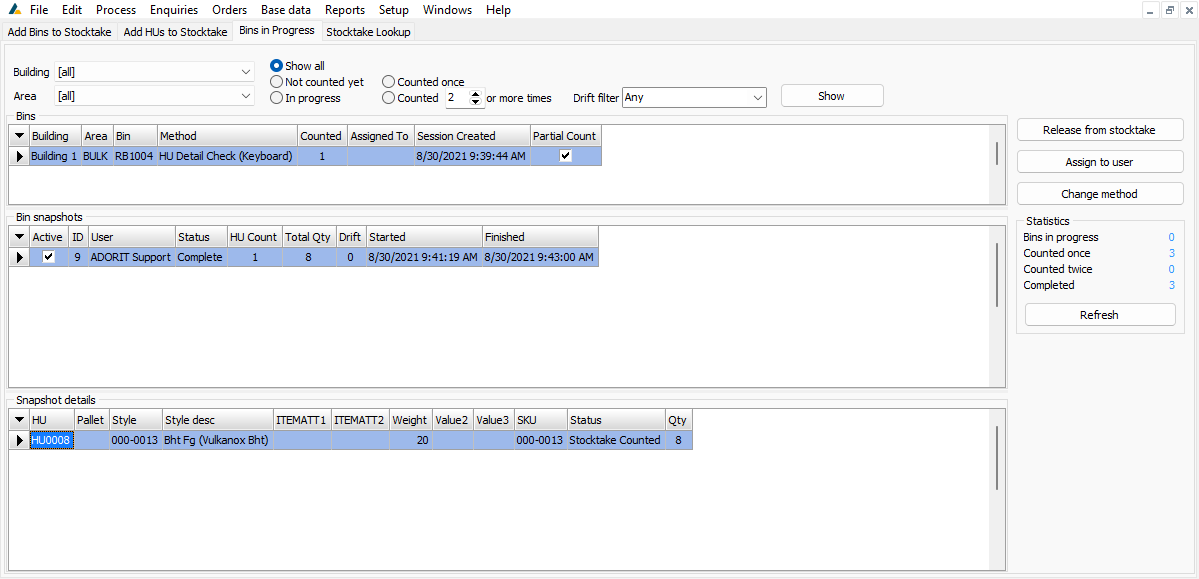
Change method
Click this to change the stocktake method assigned to the selected bin.
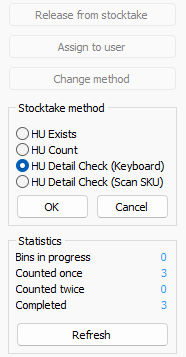
Refresh
Click this to refresh the data displayed on the page, including the statistics on the right of the screen.
Alternatively, you can right-click on a bin in the list to perform the following tasks.
Release from stocktake
As per action button function.
Cancel stocktake
Click this to cancel the stocktake task assigned to the selected bin. This will revert to the live data and not apply the active snapshot.
Assign to user
As per action button function.
Change method
As per action button function.
Refresh
As per action button function.
Once a bin has been counted, you can view the snapshots of the bin in the Bin snapshots pane. Selecting a snapshot and right-clicking it will allow you to perform the following functions:
Compare to live
Click this to compare the selected snapshot to the live count.
Set as active snapshot
Click this to set the selected snapshot as the active snapshot to be used when releasing the bin from stocktake.
Delete snapshot
Click this to delete the selected snapshot. Click Yes at the confirmation pop-up screen to confirm this action.
Stocktake Lookup
Filter the list of bins marked for stocktake by completing the applicable fields at the top of the screen and then clicking Show.
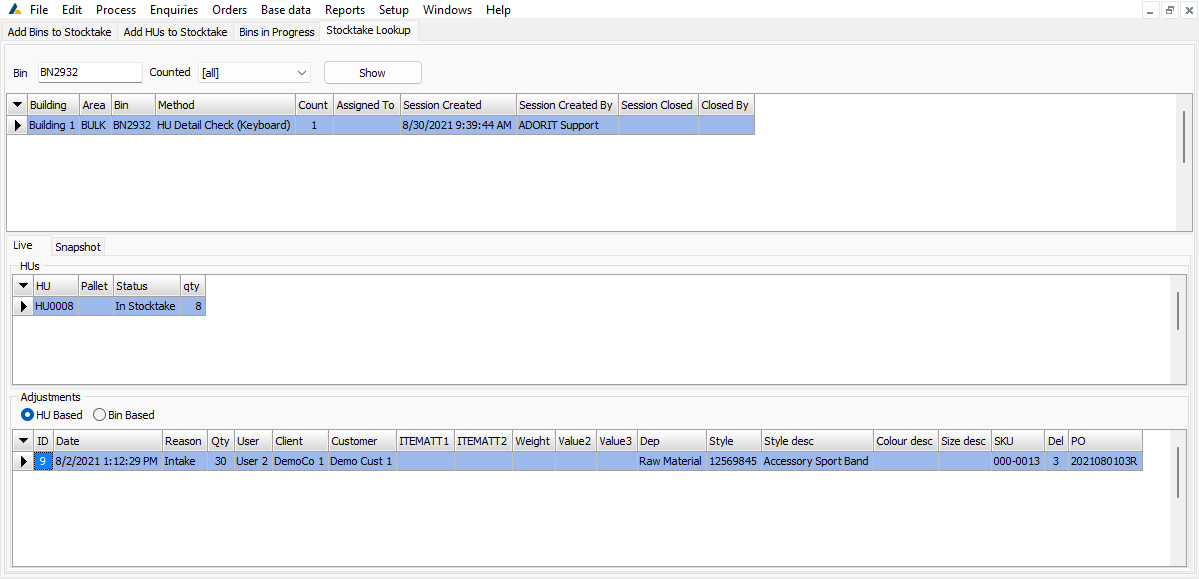
Live
Click this tab to view the HUs in the selected bin as per the live count as well as details of adjustments. Adjustments can be viewed by HU or by Bin.

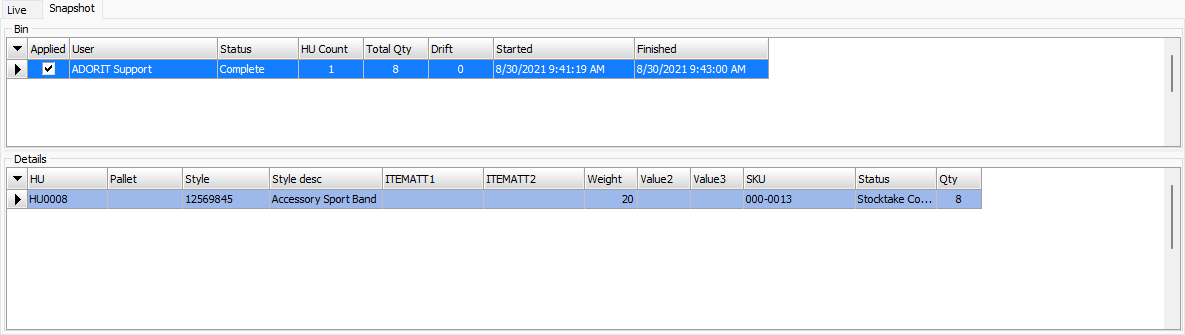
Snapshot
Click this tab to view the selected bin as per the stocktake snapshot.
Stock Transfer
To access the Stock Transfer screen, click on Stock Transfer in the Process menu.
You can filter the list of transferable stock by completing the applicable fields at the top of the screen and then clicking Show.
![]()
Select an item from the list, check the tick box of what type of transfer you want to do and complete the applicable transfer instructions at the bottom of the screen; then click Transfer. Click Yes at the confirmation pop-up box to confirm the stock transfer.
![]()
Stock Transfer Instructions
To access the Stock Transfer Instructions screen, click on Stock Transfer Instructions in the Process menu.
You can filter the list of instructions by completing the applicable fields at the top of the screen and then clicking Show.
By selecting a stock transfer instruction and right-clicking it, you can perform the following function:
Close line
Click this to close the line of the selected stock transfer instruction.
The Transfer selection list can be filtered by completing the applicable fields above the list and clicking Show.
Select an item from the list and complete the applicable transfer instructions at the bottom of the screen. Then click Transfer. Click Yes at the confirmation pop-up box to confirm the stock transfer. This is done the same way as in the Process > Stock Transfers screen.