Base Data
We are in the process of porting our user manual, this page might contain incorrect information.
Base Data
Customers
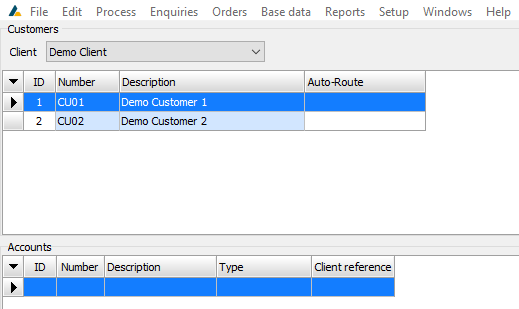
To access the Customers screen, click on the Base Data tab and then on Customers inside the drop-down menu.
Select a client using the drop-down box at the top of the screen to view the list of that client's customers.
Right-click a customer in the Customers pane to access the following functions:
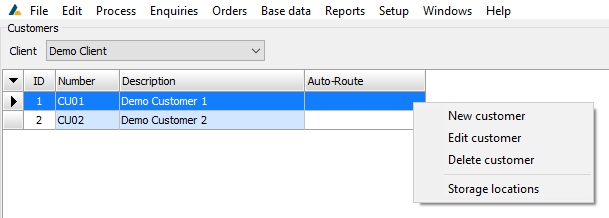
- New customer
Click this to create a new customer. Complete the applicable fields and click OK.

Edit customer
Click this to edit the selected customer. Edit the applicable fields and click OK.

Delete customer
Click this to delete the selected customer. Click Yes at the confirmation pop-up box to confirm this action.

Storage locations
Click this to create or edit storage locations for the selected customer. To exit the screen, click OK.
Right-click in the list to perform the following functions:

New building
Click this to create a new building. Complete the applicable fields and click Save.

Edit building
Click this to edit the selected building. Edit the applicable fields and click Save.
Delete building
Click this to delete the selected building. Click Yes at the confirmation pop-up box to confirm.

Right-click in the Accounts pane to access the following functions:

New account
Click this to create a new account. Complete the form accordingly and click OK.

Edit account
Click this to edit the selected account. Edit the applicable fields and click OK.
Delete account
Click this to delete the selected account. Click Yes at the confirmation pop-up screen to confirm.

Customer References
To access the Customer References screen, click on the Base Data tab and then on Customer References inside the drop-down menu.
Select a client from the drop-down list at the top of the screen.

Right-clicking a selection from the list will allow you to perform the following functions:
Add
Click this to add a new reference. Complete the fields at the bottom of the screen and click Save.
![]()
Edit
Click this to edit the selected customer reference. Edit the applicable fields at the bottom of the screen and click Save.
Delete
Click this to delete the selected reference. Click Yes at the confirmation pop-up box to confirm this action.

Departments
To access the Departments screen, click on the Base Data tab and then on Departments inside the drop-down menu. The shortcut Shift + Ctrl + D can also be used to access it.
The following functions can be performed by right-clicking an entry in the list:

New department
Click this to create a new department. Complete the applicable fields and click OK.

Edit department
Click this to edit the selected department. Edit the applicable fields and click OK.

Delete department
Click this to delete the selected department. Click Yes at the confirmation pop-up box to confirm.

Product Types
To access the Product Types screen, click on the Base Data tab and then on Product Types inside the drop-down menu. The shortcut Shift + Ctrl + T can also be used to access it.
The following functions can be performed by right-clicking an entry in the list:

Add
Click this to add a new product type. Complete the fields at the bottom of the screen and click Save.
![]()
Edit
Click this to edit the selected product type. Edit the applicable fields at the bottom of the screen and click Save.
![]()
Delete
Click this to delete the selected product type. Click OK at the confirmation pop-up screen to confirm this action.

Product Master
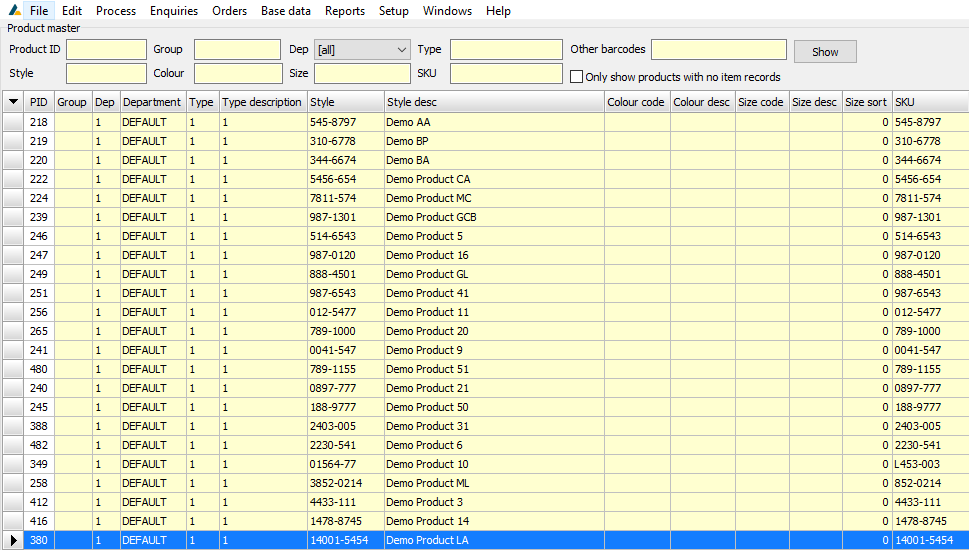
To access the Product Master screen, click on the Base Data tab and then on Product Master inside the drop-down menu. The shortcut Shift + Ctrl + P can also be used to access it.
The product list can be filtered by completing the applicable fields at the top of the screen and clicking Show.
Right-clicking an entry in the product list will allow you to perform the following functions:
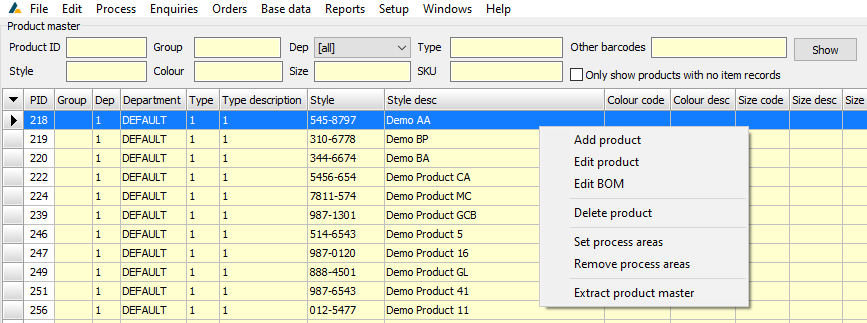
Add product
Click this to add a new product. Fill in all applicable fields and click Save.
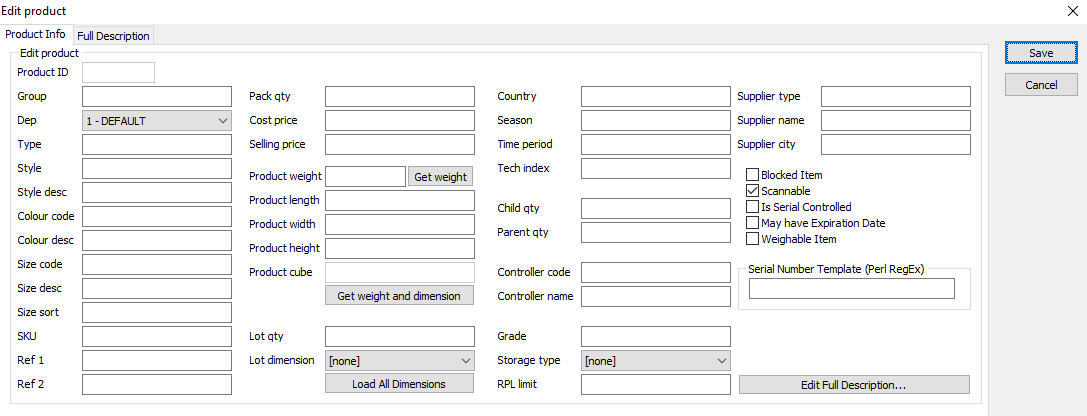
Edit product
Click this to edit the selected product. Edit the applicable fields and click Save.

Explain all these fields and incorporate serialization process guide
Edit BOM
Click this to build or edit the product BOM for the selected product. Right-click the Components field to perform the following tasks:
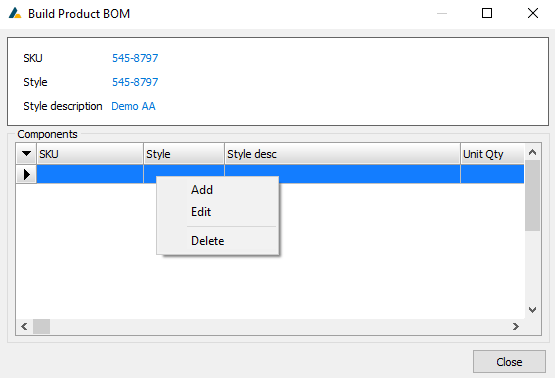
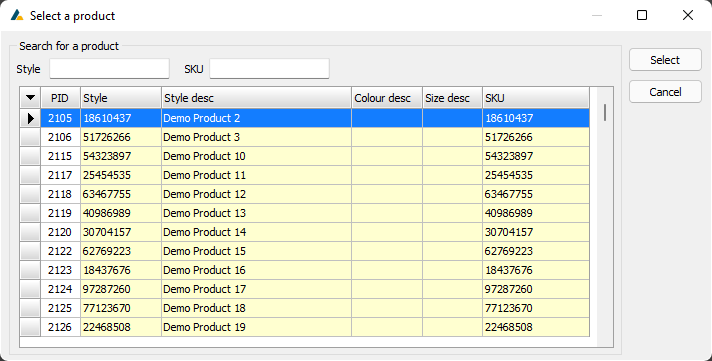
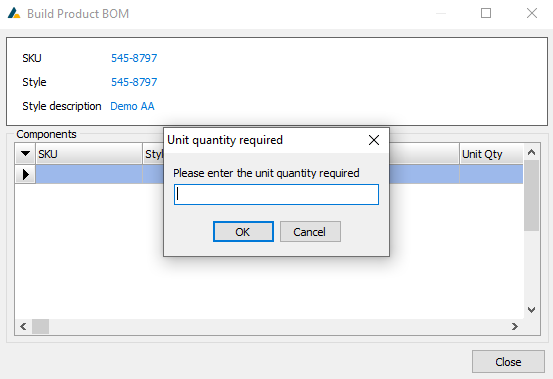
Add
Click this to add a product to the BOM. Select a product from the list and click Select. Enter the quantity required and click OK.
Edit
Click this to edit the quantity of the selected product in the BOM. Enter the new quantity and click OK to confirm.
Delete
Click this to delete the selected component product. Click Yes at the confirmation pop-up box to confirm this action.
Delete product
Click this to delete the selected product. Click Yes at the confirmation pop-up box to confirm this action.
Set process areas
Click this to set the process areas for the selected product. Select an area from the drop-down box and click Add. To remove an area, right-click it and click Remove. Click OK to confirm add/remove actions.

Remove process areas
Click this to remove all process areas from the selected product. Click Yes at the confirmation pop-up box to confirm this action.
Product Barcodes
In the Product Barcodes pane at the bottom of the screen you can see all barcodes for the selected product. Right-clicking the selected barcode will allow you to perform the following functions:
Add barcode
Click this to add a new barcode for the selected product. Enter the barcode and click OK.

Delete barcode
Click this to delete the selected barcode. Click Yes at the confirmation pop-up screen to confirm this action.
Edit Product Weight and Dimension
To access the Edit Product Weight and Dimension screen, click on the Base Data tab and then on Edit Product Weight and Dimension inside the drop-down menu.

Enter the SKU number of the product you want to edit. Complete the Weight and Cube fields and click Save to save your changes. If you are making use of a scale/dimensioner, you can use the Get weight and Get weight and dimension buttons to determine the weight and dimension of the products.
Click Close to close this window.
Items
To access the Items screen, click on the Base Data tab and then on Items inside the drop-down menu. The shortcut Shift + Ctrl + I can also be used to access it.
The list of items can be filtered by completing the applicable fields at the top of the screen and then clicking Show.
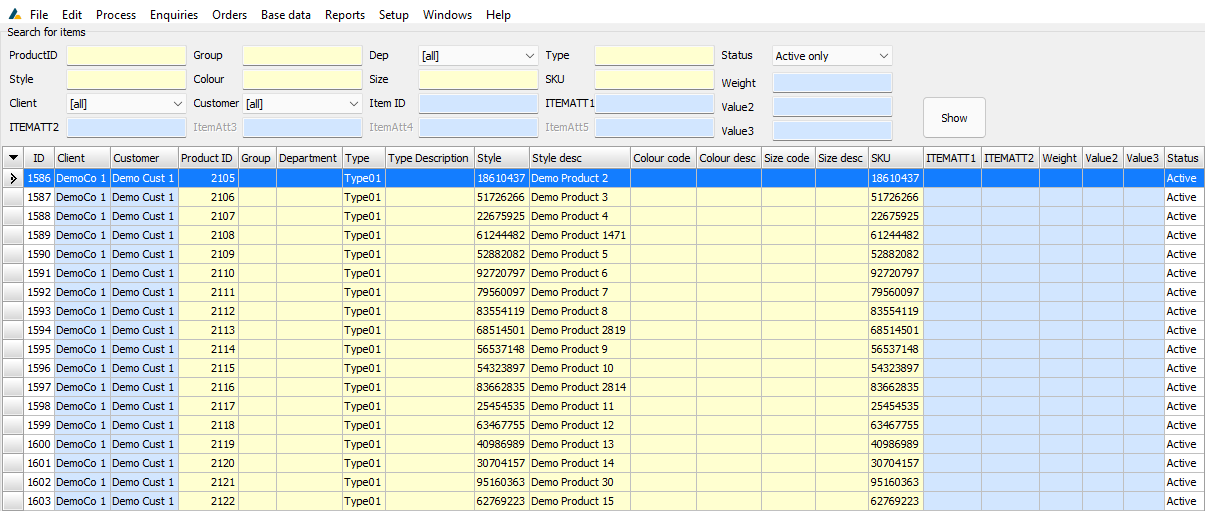
Right-clicking an item in the list will allow you to perform the following functions:
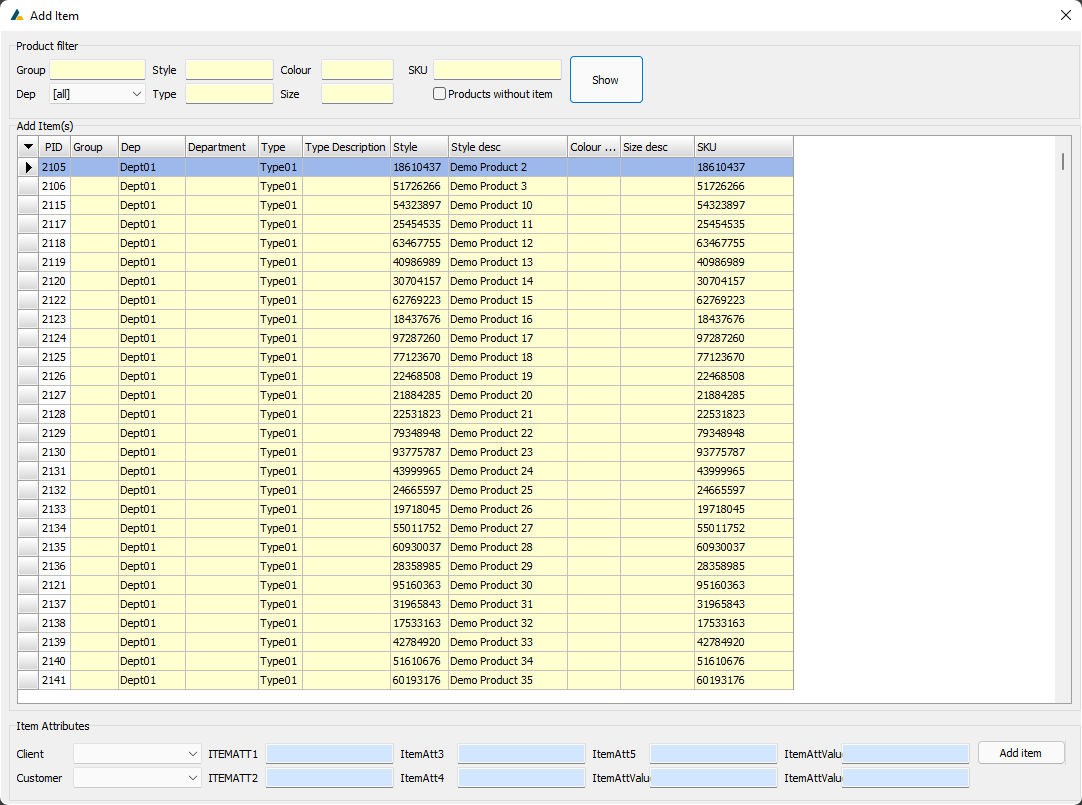
Add item
Click this to add an item. Click Show to view the list of products. You can filter this list by completing the applicable fields at the top of the window before clicking Show. Select a product from the list and then complete the Item Attributes fields at the bottom of the window. Then click Add item.
Clone item
Click this to clone the selected item. This will bring up the same window as when adding an item, but the product will already be selected. Complete the item attributes fields and click Add item.
Delete item
Click this to delete the selected item. Click Yes at the confirmation pop-up box to confirm this action.
Locations
To access the Locations screen, click on the Base Data tab and then on Locations inside the drop-down menu.
To filter the list of parent locations, complete the applicable fields at the top of the page and click Show.

Right-clicking a location in the list will allow you to perform the following functions:
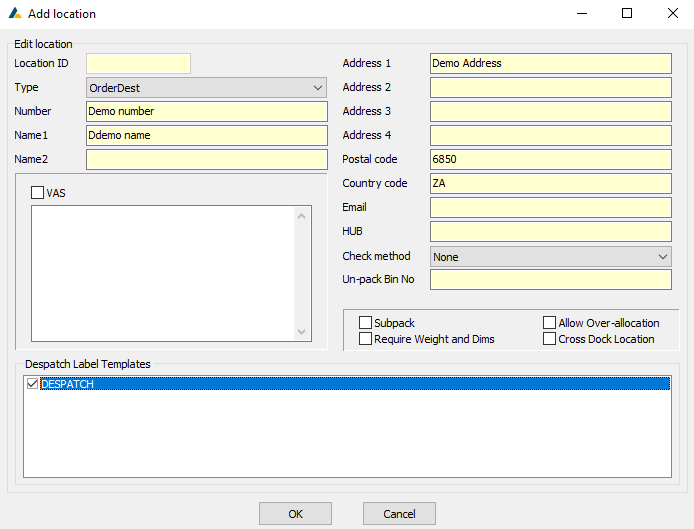
Add location
Click this to add a new location. Complete all applicable fields in the form and click OK to create the location.
Edit location
Click this to edit the selected location. Edit the applicable fields and click OK to confirm your changes.
Delete location
Click this to delete the selected location. Click Yes at the confirmation pop-up box to confirm this action.
Parent/Child
This right-click function has a sub-menu with the following functions:
Mark as children
Click this to mark the selected location as a child location.
Clear selection
Click this to clear the selection of locations marked as child locations.
Set as parent
Click this to set the selected location as a parent location.
If a location has any child locations linked to it, they will be displayed in the Child locations list at the bottom of the screen. Right-clicking a child location will allow you to perform the following functions:

Remove child
Click this to remove the selected child location. Click Yes at the confirmation pop-up screen to confirm this action.
Apply to all
By selecting a despatch label template from the list on the right-hand side of the screen, you can apply the template to all locations by clicking the Apply to all button. Click Yes at the confirmation pop-up box to confirm this action.

Shipment HUBs
To access the Shipment HUBs screen, click on the Base Data tab and then on Shipment HUBs inside the drop-down menu.
In the HUBs list, right-clicking an entry in the list will allow you to perform the following functions:

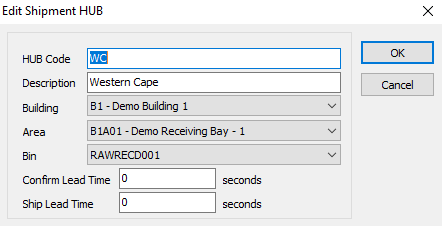
New
Click this to create a new HUB. Complete all applicable fields in the form and click OK to create the HUB.

Edit
Click this to edit the selected HUB. Edit the applicable fields and click OK to save your changes.
Delete
Click this to delete the selected HUB. Click Yes at the confirmation pop-up box to confirm.

Locations
In the Locations list at the bottom of the screen, right-clicking an entry in the list will allow you to perform the following functions:
Add
Click this to add a new location to the selected HUB. Select a location from the list and click OK to add it.
Remove
Click this to remove the selected location from the selected HUB. Click Yes at the confirmation pop-up box to confirm this action.
Zones
To access the Zones screen, click on the Base Data tab and then on Zones inside the drop-down menu.
Right-clicking an entry in the Zones list will allow you to perform the following functions:
New
Click this to create a new zone. Complete all applicable fields in the form and click OK.

Edit
Click this to edit the selected zone. Edit the applicable fields and click OK to save your changes.

Delete
Click this to delete the selected zone. Click OK at the confirmation pop-up box to confirm this action.

Areas
Selecting a zone will display all of its areas in the Areas pane at the bottom of the screen. Right-clicking an entry in the areas list will allow you to perform the following functions:

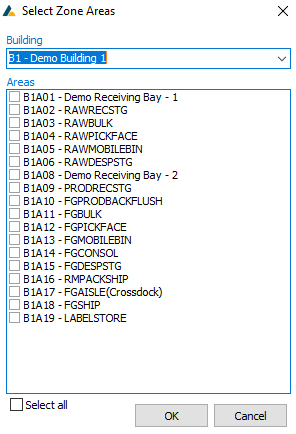
Add
Click this to add a new area to the selected zone. Select the applicable areas from the list (multiple areas can be added at once) and click OK to add.
Remove
Click this to remove the selected area from the zone. Click Yes at the confirmation pop-up box to confirm removal.

Layout
To access the Layout screen, click on the Base Data tab and then on Layout inside the drop-down menu. The shortcut Shift + Ctrl + L can also be used to access it.
Bins
By right-clicking an entry in the Buildings pane, you can perform the following functions:

New building
Click this to create a new building. Complete all applicable fields in the form and click OK.

Edit building
Click this to edit the selected building. Edit the applicable fields and click OK to save your changes.
Delete building
Click this to delete the selected building. Click Yes at the confirmation pop-up box to confirm this action.
Areas
Selecting a building will display all of its areas in the Areas pane. Right-clicking an entry in the Areas list will allow you to perform the following functions:

New area
Click this to create a new area for the selected building. Complete all applicable fields in the form and click OK.

Edit area
Click this to edit the selected area. Edit the applicable fields and click OK to save your changes.
Delete area
Click this to delete the selected area. Click Yes at the confirmation pop-up box to confirm deletion.
Move bins to another area
Click this to move all bins assigned to the selected area to another area. Enter the target area number and click OK to confirm.

Bins
Selecting an area will display all of its bins in the Bins pane. Right-clicking an entry in the bins list will allow you to perform the following functions:

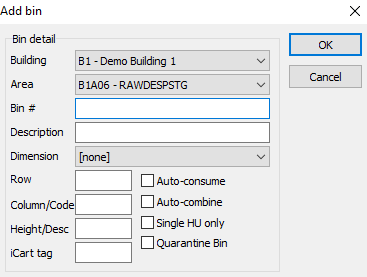
New bin
Click this to add a new bin to the selected area. Complete all applicable fields in the form and click OK.
Edit bin
Click this to edit the selected bin. Edit the applicable fields and click OK to save your changes.
Delete bin
Click this to delete the selected bin. Click OK at the confirmation pop-up box to confirm deletion.
Debug
The debug function has a sub-menu with the following functions:
Recalculate priority
Click this to recalculate the priority of all bins in the selected area.
Import pick units
Click this to import pick units for the selected bin. Select the CSV file that you want to import and click Open to import the file. --->
Import bins
Click this to import bins from a template file. Select the template file by clicking the "..." button to browse your PC and then clicking Open after selecting the file. Check the applicable boxes and then click Import.

Export bins
Click this to export the selected bin to a template file. At the confirmation pop-up box, click Yes to export only the selected bin or click Yes to all to export all bins. Give your file a name and select a location for it on your PC. Then click Save to save the template file.

Auto Combine
When adding or editing a bin, that bin can be flagged as Auto-combine.
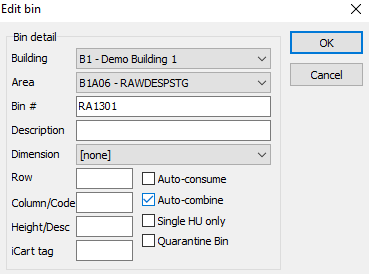
This means that any stock moved into this bin using either HU Move or Pallet Move will automatically be combined into a virtual HU using the same number as the bin.
Bin Maintenance
To access the Bin Maintenance screen, click on the Base Data tab and then on Bin Maintenance inside the drop-down menu. The shortcut Shift + Ctrl + B can also be used to access it.
The list of bins can be filtered by completing the applicable fields at the top of the screen and clicking Show.

Selecting a bin from the list and right-clicking it will allow you to perform the following functions:
Unassign bin
Click this to unassign the selected bin. Alternatively, you can press the Del button on your keyboard. Click Yes at the first confirmation pop-up box to confirm this action. At the second confirmation pop-up box, click either Yes or No depending on whether you want to clear the selected bin's replenishment settings as well.
Unassign all bins
Click this to unassign all bins that do not contain any stock. Click Yes at the confirmation pop-up box to confirm this action.
Export RPL Setup
Click this to export the RPL setup for the selected bin. Name your file and choose a file location on your PC and click Save.
Import RPL Setup
Click this to import an RPL setup from a saved CSV file. Select the file to be imported and click Open.
Print bin contents
Click this to print the contents of the selected bin. Click Preview to preview the document or click Print to print the document.

Edit reference
Click this to edit the bin reference for the selected bin. Enter the bin reference in the text field and click OK to save it.

Remove reference
Click this to remove the bin reference from the selected bin. Click Yes at the confirmation pop-up box to confirm.
Properties Tab
This tab allows you to view and edit the properties of the selected bin.

After editing any of the fields, click Update to save your changes.
Assign item
This tab allows you to assign items to the selected bin.

The list of items can be filtered by completing the applicable fields and then clicking Search.
Assign
Click this to assign the selected item to the selected bin. Alternatively, you can right-click the selected item and click Assign to selected bin or press the Ins button on your keyboard.
Auto-assign
Click this to auto-assign all the visible items (as per list filter) to the selected bin. Click Yes at the confirmation pop-up screen to confirm this action. Alternatively, you can right-click an item in the list and then click Auto-assign selection or you can use the keyboard shortcut Ctrl + Ins.
Replenishment settings Tab
This tab allows you to view and edit replenishment settings for the selected bin.
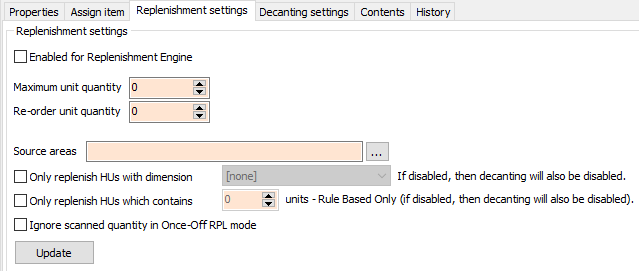
Complete/edit the applicable fields and click Update to save your changes.
Decanting settings Tab
This tab allows you to view and edit decanting settings for the selected bin.

Complete/edit the applicable fields and click Update to save your changes.
Contents Tab
This tab allows you to view the contents of the selected bin.

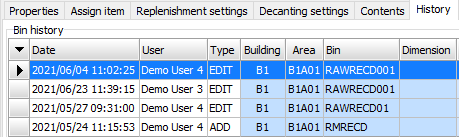
History Tab
This tab allows you to view the history of the selected bin.
Pick Unit Maintenance
To access the Pick Unit Maintenance screen, click on the Base Data tab and then on Pick Unit Maintenance inside the drop-down menu. The shortcut Shift + Ctrl + U can also be used to access it.
The list of pick units can be filtered by completing the applicable fields at the top of the screen and then clicking Show.
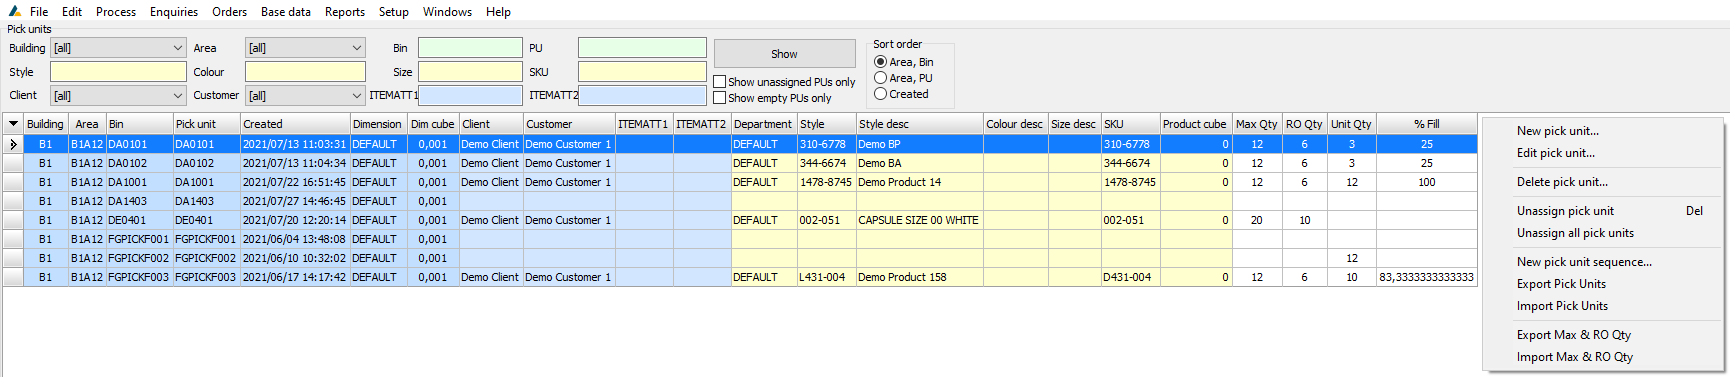
By selecting a pick unit from the list and right-clicking it, the following functions can be performed:
New pick unit
Click this to add a new pick unit. Complete all applicable fields in the form and click OK to create.

Edit pick unit
Click this to edit the selected pick unit. Edit the applicable fields and click OK to save your changes.
Delete pick unit
Click this to delete the selected pick unit. Click Yes at the confirmation pop-up screen to confirm deletion.
Unassign pick unit
Click this to unassign the selected pick unit. Alternatively, you can press the Del button on your keyboard. Click Yes at the confirmation pop-up box to confirm this action.
Unassign all pick units
Click this to unassign all pick units that do not contain any stock. Click Yes at the confirmation pop-up box to confirm this action.
New pick unit sequence
Click this to create a new sequence of pick units. Complete all applicable fields in the form and click OK to create the sequence.

Export Pick Units
Click this to export the list of pick units as a CSV file. Name your file and choose a location on your PC and then click Save.
Import Pick Units
Click this to import pick units from a CSV file. Select the file from a location on your PC and click Open to import it.
Export Max & RO Qty
Click this to export the Max & RO quantities for the pick units as a CSV file. Name your file and choose a location on your PC and then click Save.
Import Max & RO Qty
Click this to import Max & RO quantities for the pick units from a CSV file. Select the file from a location on your PC and click Open to import it.
Assign item Tab
This tab allows you to assign items to the selected pick unit.

The list can be filtered by completing the applicable fields at the top of the pane and clicking Search.
By selecting an item and right-clicking it, you can perform the following functions:
Assign to selected pick unit
Click this to assign the selected item to the selected pick unit. You can also press the Insert button on your keyboard to do this.
Auto-assign selection
Click this to auto-assign all the visible items in the list (as per filter options) to the selected pick unit. You can also use the keyboard shortcut Ctrl + Ins to do this. Click Yes at the confirmation pop-up box to confirm this action.
Contents Tab
This tab allows you to view the contents of the selected pick unit.

Dimensions
To access the Dimensions screen, click on the Base Data tab and then on Dimensions inside the drop-down menu.
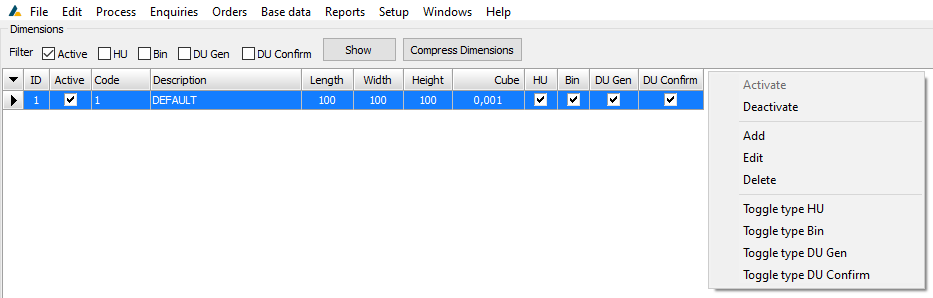
Right-clicking an entry in the list will allow you to perform the following functions:
Activate
Click this to activate the selected Dimension, if it is inactive.
Deactivate
Click this to deactivate the selected Dimension, if it is active.
Add
Click this to add a new Dimension. Complete the applicable fields at the bottom of the screen and click Save.

Edit
Click this to edit the selected Dimension. Edit the applicable fields at the bottom of the screen and click Save.
Delete
Click this to delete the selected Dimension. Click Yes at the confirmation pop-up screen to confirm.

Toggle Type HU
Toggle Type Bin
Toggle Type DU Gen
Toggle Type DU Confirm
The four functions mentioned above all toggle what type of Dimension the selected Dimension should be. Clicking one of these options will toggle that specific type for the selected Dimension. Refreshing the screen will display your changes.
![]()
Product Dimensions
To access the Product Dimensions screen, click on the Base Data tab and then on Product Dimensions inside the drop-down menu.

Right-clicking an entry in the list will allow you to perform the following functions:
Add
Click this to add a new product dimension. Complete the applicable fields at the bottom of the screen and click Save.

Edit
Click this to edit the selected product dimension. Edit the applicable fields at the bottom of the screen and click Save.
Delete
Click this to delete the selected product dimension. Click Yes at the confirmation pop-up screen to confirm.

Item Dimension Ratio
To access the Item Dimension Ratio screen, click on the Base Data tab and then on Item Dimension Ratio inside the drop-down menu.
Assign items to dimension
This tab allows you to assign items to a dimension.
In the Items pane in the centre of the screen, filter your search accordingly and click Show to display items.

Select an item and then select the dimension that you want to add it to, then click Create ratio.

Enter the quantity and click OK.

The ratio will now be displayed in the Ratios pane on the right-hand side of the screen.

Assign dimensions to item
This tab allows you to assign dimensions to an item.
In the Items pane at the top of the screen, filter your search accordingly and click Show to display items.

Select an item and then select the dimension that you want to add to it, then click Create ratio.

Enter the quantity and click OK.

The ratio will now be displayed in the Ratios pane at the bottom of the screen.

View ratios
This tab displays a list of all ratios that have been created. The list can be filtered by completing the fields at the top of the screen and clicking Show.

Ratio Packs
TODO
To access the Ratio Packs screen, click on the Base Data tab and then on Ratio Packs inside the drop-down menu.
Search for a specific ratio pack by typing the Name in the field at the top of the screen and clicking Show. Leaving the field blank will display all packs. Details of each pack are displayed in the bottom pane of the screen.
![]()
To delete a ratio pack, select it and click the Delete button, or right-click it and then click Delete ratio. Click Yes at the confirmation pop-up screen to confirm.

Allocation Types
To access the Allocation Types screen, click on the Base Data tab and then on Allocation Types inside the drop-down menu.
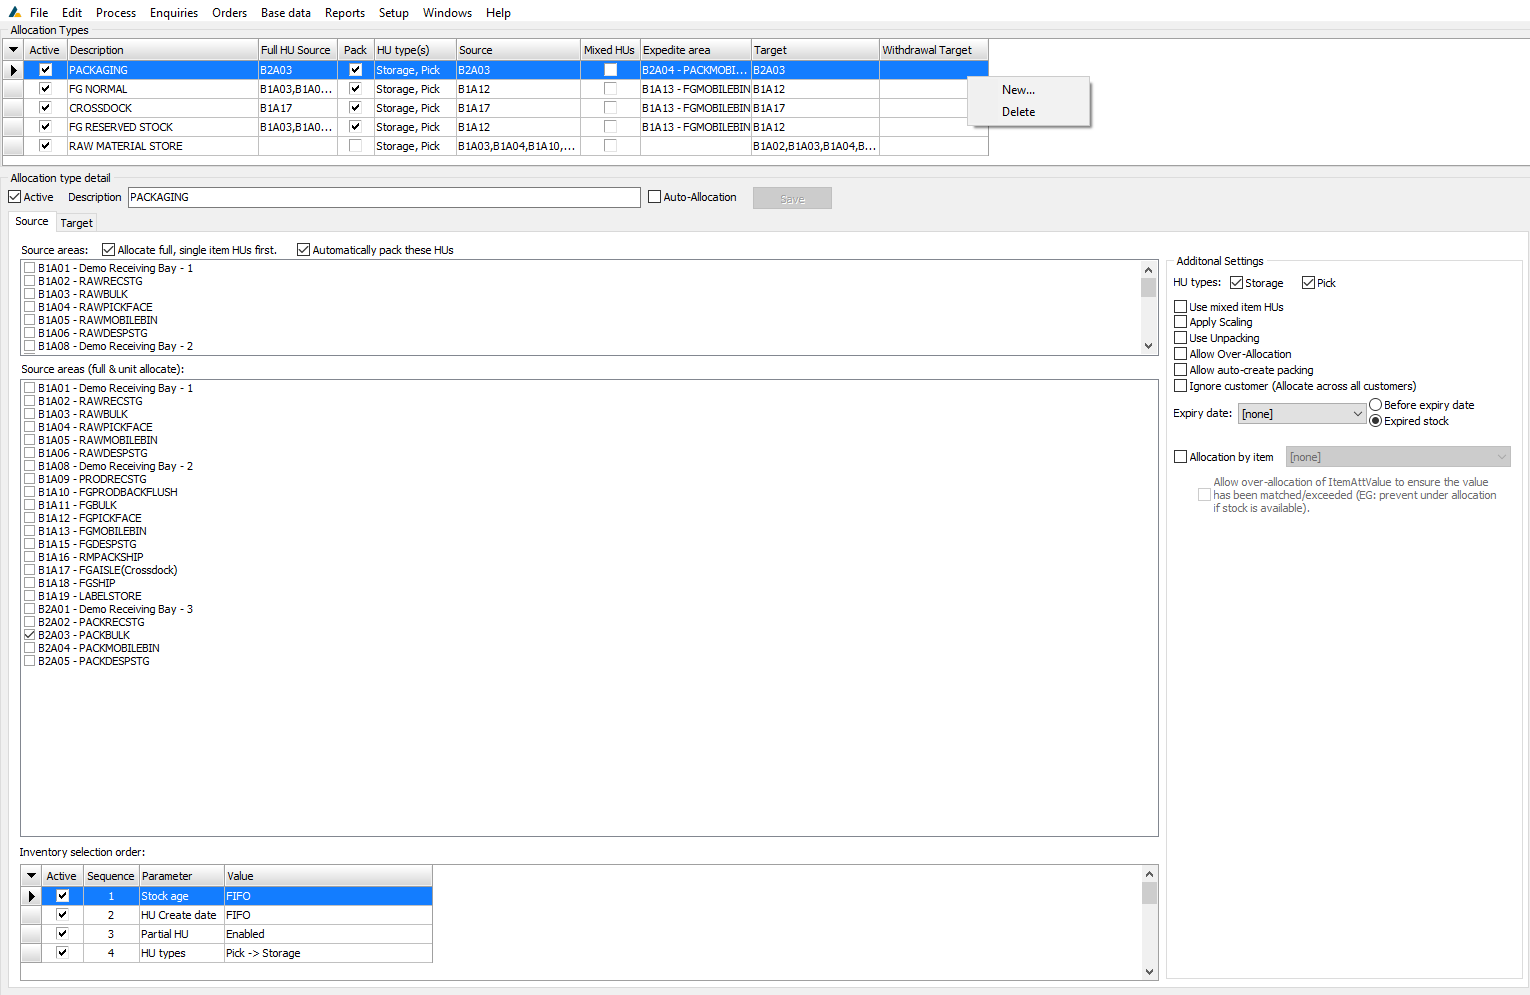
All allocation types are displayed at the top of the screen. Right-clicking an entry in the list will allow you to perform the following functions:
New
Click this to add a new allocation type. Complete all the applicable fields and then click Save.
Delete
Click this to remove an allocation type. Click Yes at the confirmation pop-up screen to confirm.
Editing Allocation Types
When creating a new allocation type or when editing one, all changes are made on the main screen and committed by clicking Save.
Set whether the allocation type is active, give it a description and set whether Auto-Allocation is on of off.
![]()
Source
If full, single item HU's must be allocated first, check this box and select your source areas from the Source pane. If the HU's must be automatically packed, check this box too.

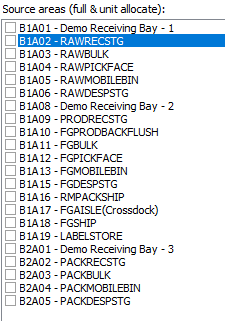
Select source areas for full and unit allocation from the Source areas (full & unit allocate) pane.
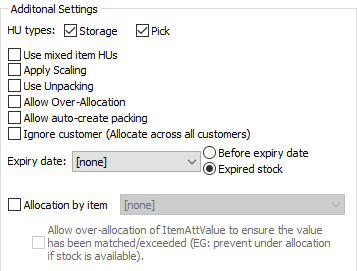
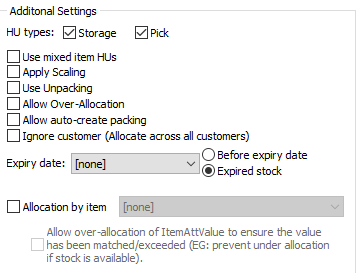
HU Types, expiry dates and other settings can be found on the right side under Additional Settings
Select the sequence in which bins should be selected for picking/packing in the Inventory Selection Order pane.

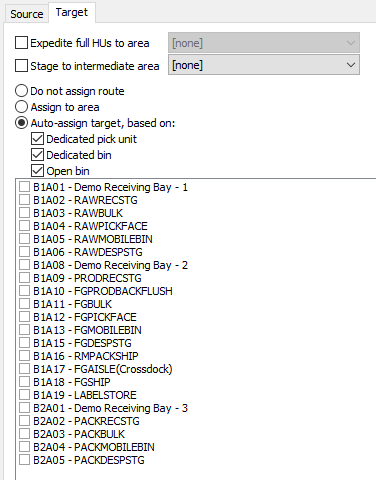
Target
Select your target areas and your area assignment options in the Target pane.
Remember to save your changes once you are done.
![]()
Auto-Routing Types
To access the Auto-Routing Types screen, click on the Base Data tab and then on Auto-Routing Types inside the drop-down menu.
This screen allows the user to manage Auto-Routing Types that are used on acceptance of a delivery.
Create and Edit Auto-Routing Types
Auto-Routing Types can be created, edited or deleted by right-clicking the Routing Types grid and selecting the required option.

Creating or editing an Auto-Routing Type will allow the user to edit the Name and Description fields, as well as select default bins for General Routing Failure and No Matching Rules.
Select a bin from the General Routing Failure and No Matching Rules drop-down boxes to allow the stock to be routed to a bin in the event of a general failure or none of the criteria of the existing rules being met for the chosen delivery.


Create and Edit Rules per Auto-Routing Type
Each Auto-Routing Type can have a series of rules, which determine where the received stock must be routed to when the delivery is accepted.

To add, edit or delete a rule, right-click the Rules Priority grid and then select the applicable option.
Add Rule
When adding a new rule, a rule type selection will p up. Select the type of rule and then click OK. The rule types are explained below:
Picking -- This rule will check for Pick Units that can be replenished, which are assigned to the items being received. This rule would normally be given the highest priority.
Bulk -- This rule will check for empty bins in a Put away type area. If applicable, the rule will check the bin priority of any assigned Pick Units for the item and try to route to a bulk bin with a similar priority. This rule is normally setup to run if no suitable Pick Units can be found to be replenished.
Put away -- This rule is a standard put away route. It will either route the stock to a Put away type area or to a user-specified area.
Each rule can also be customised in terms of what to do on failure or success of that rule, as well as where to log the results.
Options for Specific Rules
Picking
Stock Strategy -- Apply "First in, First out" or "Last in, First out" principles
Failure parameters -- If higher priority/earlier expiry/must be used for replenishment first stock is found in either a Bulk or Put away area, then stock will not be routed to the Pick Unit
Bin Priority -- Select the order in which Bin Priority is calculated
Bulk
Stock Strategy -- Select whether Bin Priorities should be sorted in ascending or descending order
Other parameters -- Select whether the Bin Priority should be based on that of Pick Units for the same item, if the rule should fail if no Pick Units have been assigned to the item, and whether any other empty bulk bin can be used if the immediate priority bins around the Pick Unit are already full.
Put away
- General rules -- Select whether any Put away type area should be used or if stock must be routed to a specific area
Allocation Types
New features/options have been added to Base Data > Allocation Types.
Auto-Allocation
If this box is checked for the selected Allocation Type, this Allocation Type will be displayed after accepting a delivery for a PO that has been flagged as "Auto-allocate".
![]()
Use Unpacking
If this box is checked for the selected Allocation Type, then the Unpacking feature can be used for orders allocated using this method. During allocation, the HU's being allocated to the order will be marked as "Unpacking".
Checking this box will automatically check the "Use Scaling" box, as the two functions must be used together.
Apply Scaling
If this box is checked for the selected Allocation Type, scaling logic will be applied when multiple orders are allocated together.
Allow Over-Allocation
If this box is checked for the selected Allocation Type, over-allocation will be allowed for any orders allocated with this allocation type. I.e. all units of the requested Item in the source area will be allocated to the order, regardless of whether that quantity is greater than the quantity ordered.
Customers
A new feature has been added to Base Data > Customers.
Default Auto-Routing Type
Each Customer now has a Default Auto-Routing Type. Right-click the Customer and click Edit Customer.
Select a routing type from the Route Type drop-down.
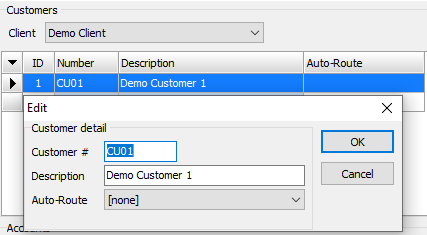
When scheduling a delivery for this Customer, the selected routing type will be automatically selected for the delivery.
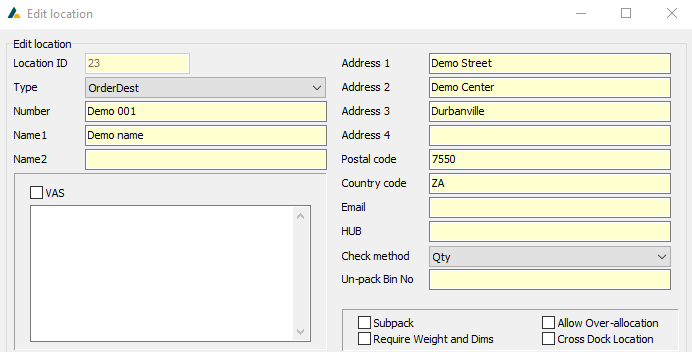
Locations
A new feature has been added to Base Data > Locations.
Allow Over-Allocation
If Over-Allocation is enabled on an Allocation Type, the Order Destination must also have this parameter enabled for Over-allocation to take place. If it is disabled, orders sent to this Location will only be allocated until full and not over-allocated. To enable this, follow these steps:
Right-click the selected Location and click Edit Location.
Check the Allow Auto-Allocation box and click OK.
Process
This section has not yet been updated
Configure the PO's & Deliveries
Toggle Auto-Allocation
To use Auto-Allocation and Unpacking, the PO being received must be set to use Auto-Allocation.
In Process > Intake, right-click the PO and then click Toggle Auto Allocate.
This flag is visible in the grid in the Auto Allocation column.

![]()
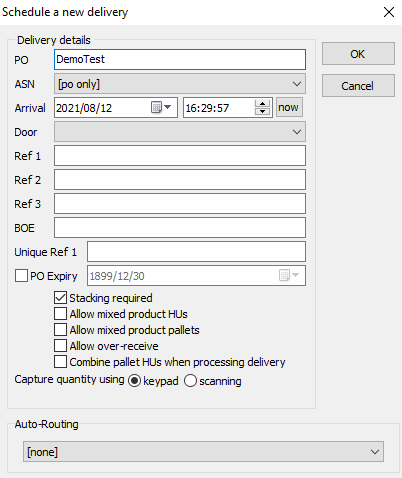
Schedule Delivery
When scheduling a delivery in Process > Intake, the pop-up screen containing the delivery's details and settings will now have an additional drop-down box with the Auto-Routing type for the delivery. If this has been configured for the PO's Customer, it will be automatically populated. Otherwise, the user can select an Auto-Routing type from the drop-down.
The Auto-Routing type can be changed prior to the delivery being accepted by using the Edit Delivery function in the Process > Deliveries screen.
Configure the Orders
Only orders that have been assigned to Unpack Bins can be automatically allocated on acceptance of a delivery.
To assign an Unpack Bin, go to Orders > Edit Multiple Orders.
Select the order you wish to assign to a bin, and then click the Set Unpack Bin button.
![]()
You can then select a bin from the drop-down box and assign it by clicking OK.

To remove an Unpack Bin from the selected order, click Un-Set Unpack Bin.
Accepting a Delivery
In Process > Deliveries, the various Accept & Route Delivery buttons have all been combined back into the original Accept Delivery button.
When accepting a delivery, if the delivery has an Auto-Routing type assigned, the auto-routing dialog box will open and provide a breakdown of where each HU will be routed to. The user can then choose to either Commit or Rollback the transaction.
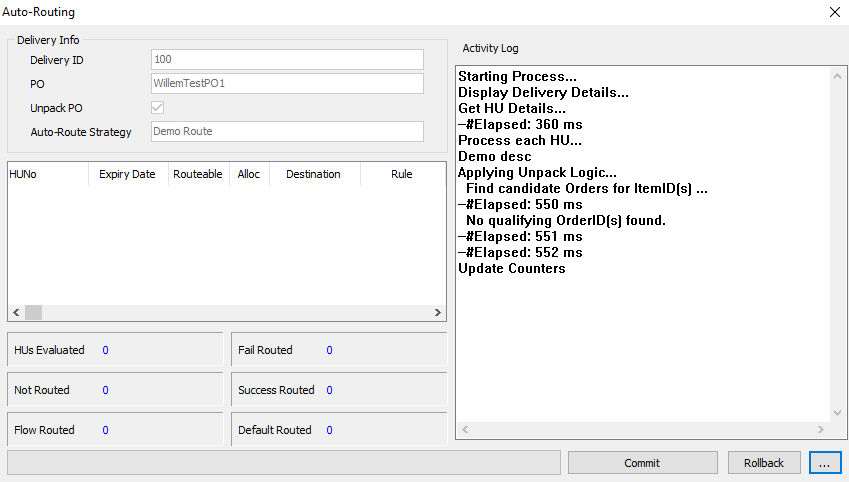
If the PO has been flagged for Auto-Allocation, an additional message will pop up to inform the user that this will take place after the user clicks Commit.

The user will then be able to select which Auto-Allocation type to use, and any orders assigned to Unpack Bins that can be allocated will be allocated from the stock that is being received on the selected Delivery.

Allocating Orders
In the Process > Orders screen, the various Allocate Orders with Scaling options have been combined back into the original Allocate button.
![]()
Each Allocation Type must be configured prior to allocating any orders so that those types that use Scaling logic or Unpacking logic are enabled.